
A field guide to PotionUI
Your studio,
explained.
From a first idea to a collection worth keeping. Learn the tools, find your workflow, and make PotionUI your own.
From choosing a preset to keeping your first result.
Start creating Shape your studioSet up your models, tools, and the people using them.
Explore your setupOne workspace, many ways to create
PotionUI is a self-hosted AI studio. Open it in your browser, choose a model-specific preset, and work with a form designed for that task. Generation can run on your own machine or on a configured remote backend.
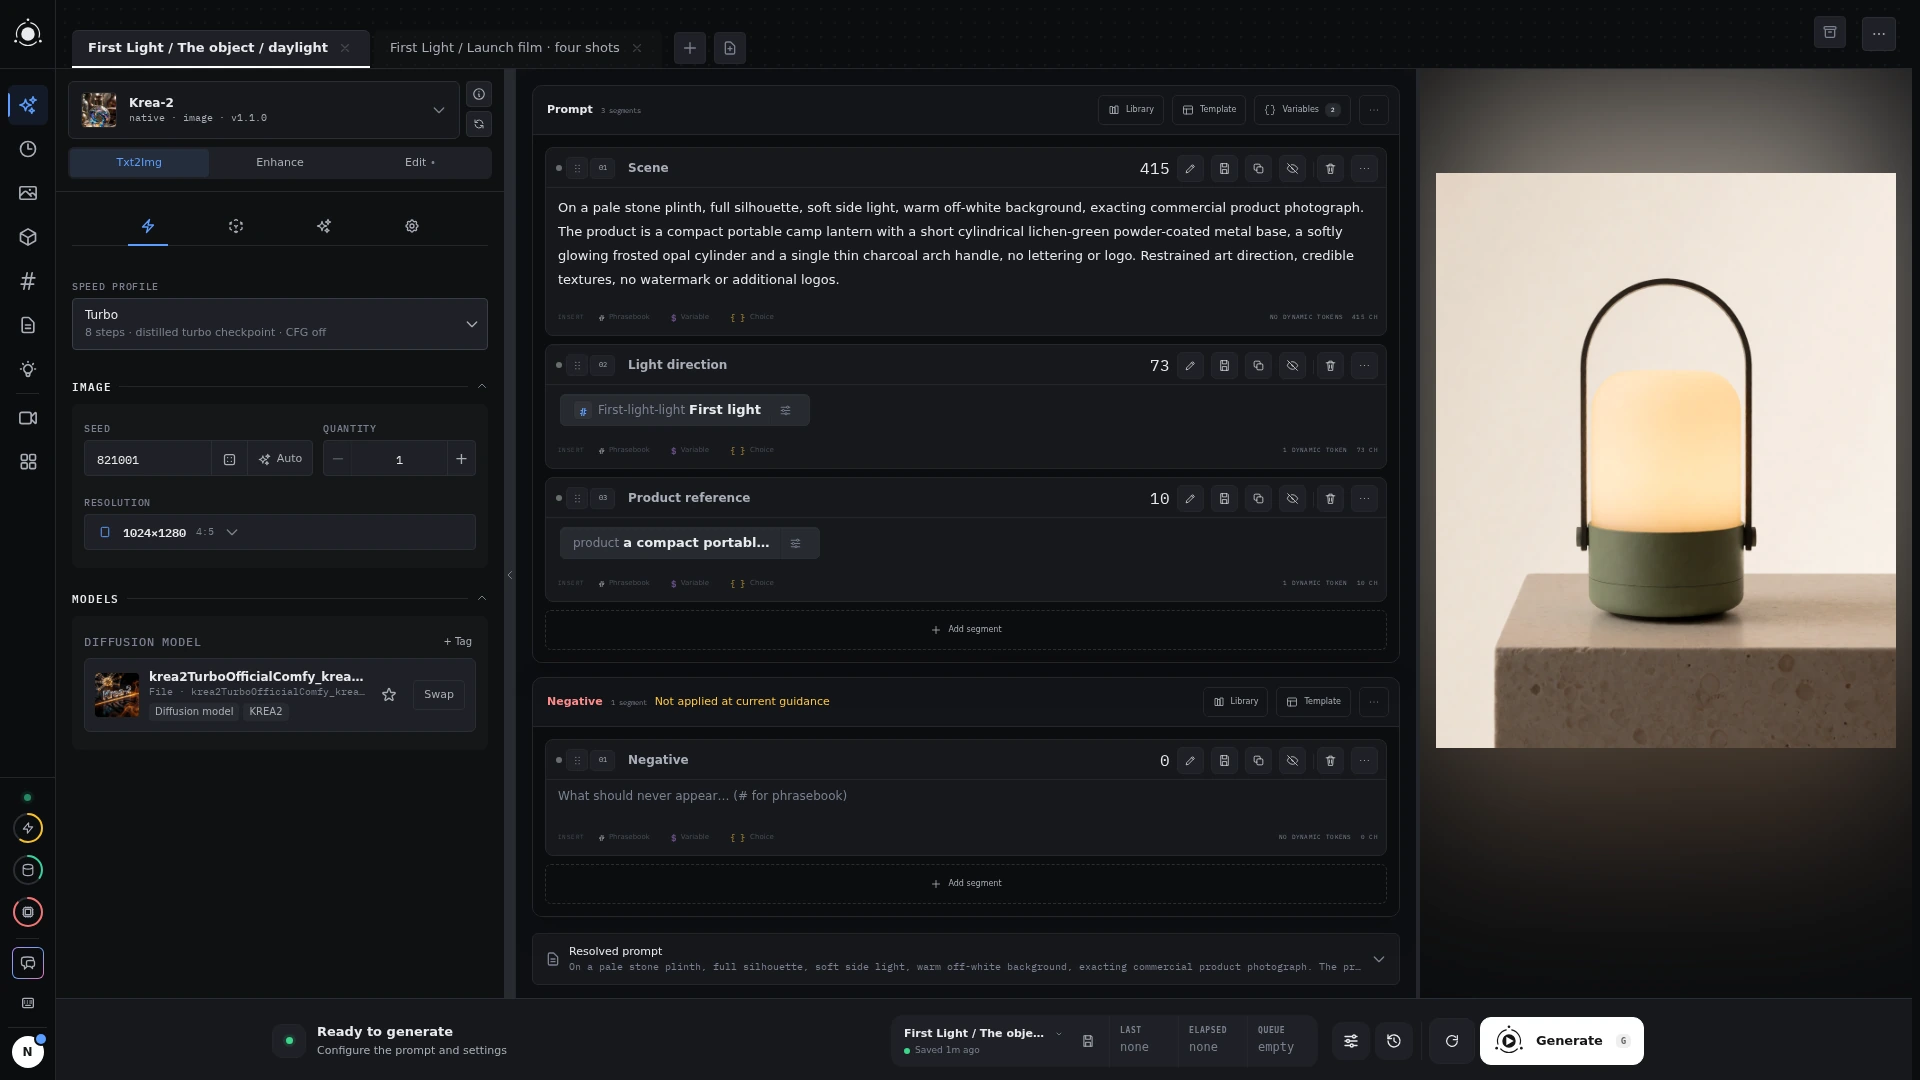 The generation workspace
Find your way around
Read from the beginning or use the section menu to jump to a feature. Screenshots open in a viewer with a full-size option, so you can inspect the actual controls. The First Light campaign appears throughout as a worked example.
PotionUI is in alpha. Available controls depend on your preset, enabled plugins, and account access. Screenshots show real app captures; your installed version may look a little different.
01 / Start here
Your first generation
A preset, a prompt, and somewhere to run it. That’s the starting point.
Open your studio
If you haven’t installed PotionUI, begin with the installation options and hardware guide ↗. Open the address printed by the launcher in your browser.
On a fresh installation, create the owner account. The first account becomes an administrator. If you connect from another machine, enter the one-time claim code printed by the server. Guided setup then helps you choose a model directory, configure a backend, and approve any required downloads.
Joining an existing studio? Sign in with the account your administrator created, or register if the owner has enabled registration.
Make an image
- Choose a preset and mode
Open Generate. Pick an available image preset, then its text-to-image mode. The form changes to show that preset’s controls.
- Describe what you want
Start with one prompt segment: a subject, a setting, and the light. Add negative direction if your preset supports it.
- Keep the first run simple
Use the preset’s defaults, select a supported resolution, and generate one image. Required model files must be installed and available to your account.
- Generate, then refine
Press Generate. Watch progress in the Workbench, inspect the finished image, and change one part of your idea for the next run. The result and its recorded settings are saved to History.
Installing a preset gives you the workflow and controls. Guided setup or model management supplies the model files it needs.
02 / Create
Generation workspace
Keep the idea, the controls, and the result in view.
Read the workspace
- Preset & mode
- Choose the tool and the kind of generation. Switching presets resets the mode and form to match the new tool.
- Prompt editor
- Compose positive and negative directions as ordered segment cards. Some presets use multiple prompt lists or Video Director.
- Generation form
- Choose models, dimensions, seed, quantity, and any optional controls the preset exposes.
- Workbench
- Inspect previews and results. Resize the preview area and step through batch items or video outputs.
Follow a run
Generate starts the job; while it runs, the control becomes Cancel. Progress reports the current pipeline stage, such as loading models, encoding the prompt, generating, or upscaling. Intermediate previews appear when the pipeline provides them.
Jobs run on the server. Switching tabs, leaving the page, or reloading does not cancel a run. PotionUI reconnects to its state when you return. The workspace identifies a busy tab so you can jump back to it.
Inspect and compare
Open a result at full size or send it back to the Workbench. Compare two images with a movable divider to inspect differences. A run may also expose artifacts: the actual seed, applied models, or a before-and-after image from an enhancement step.
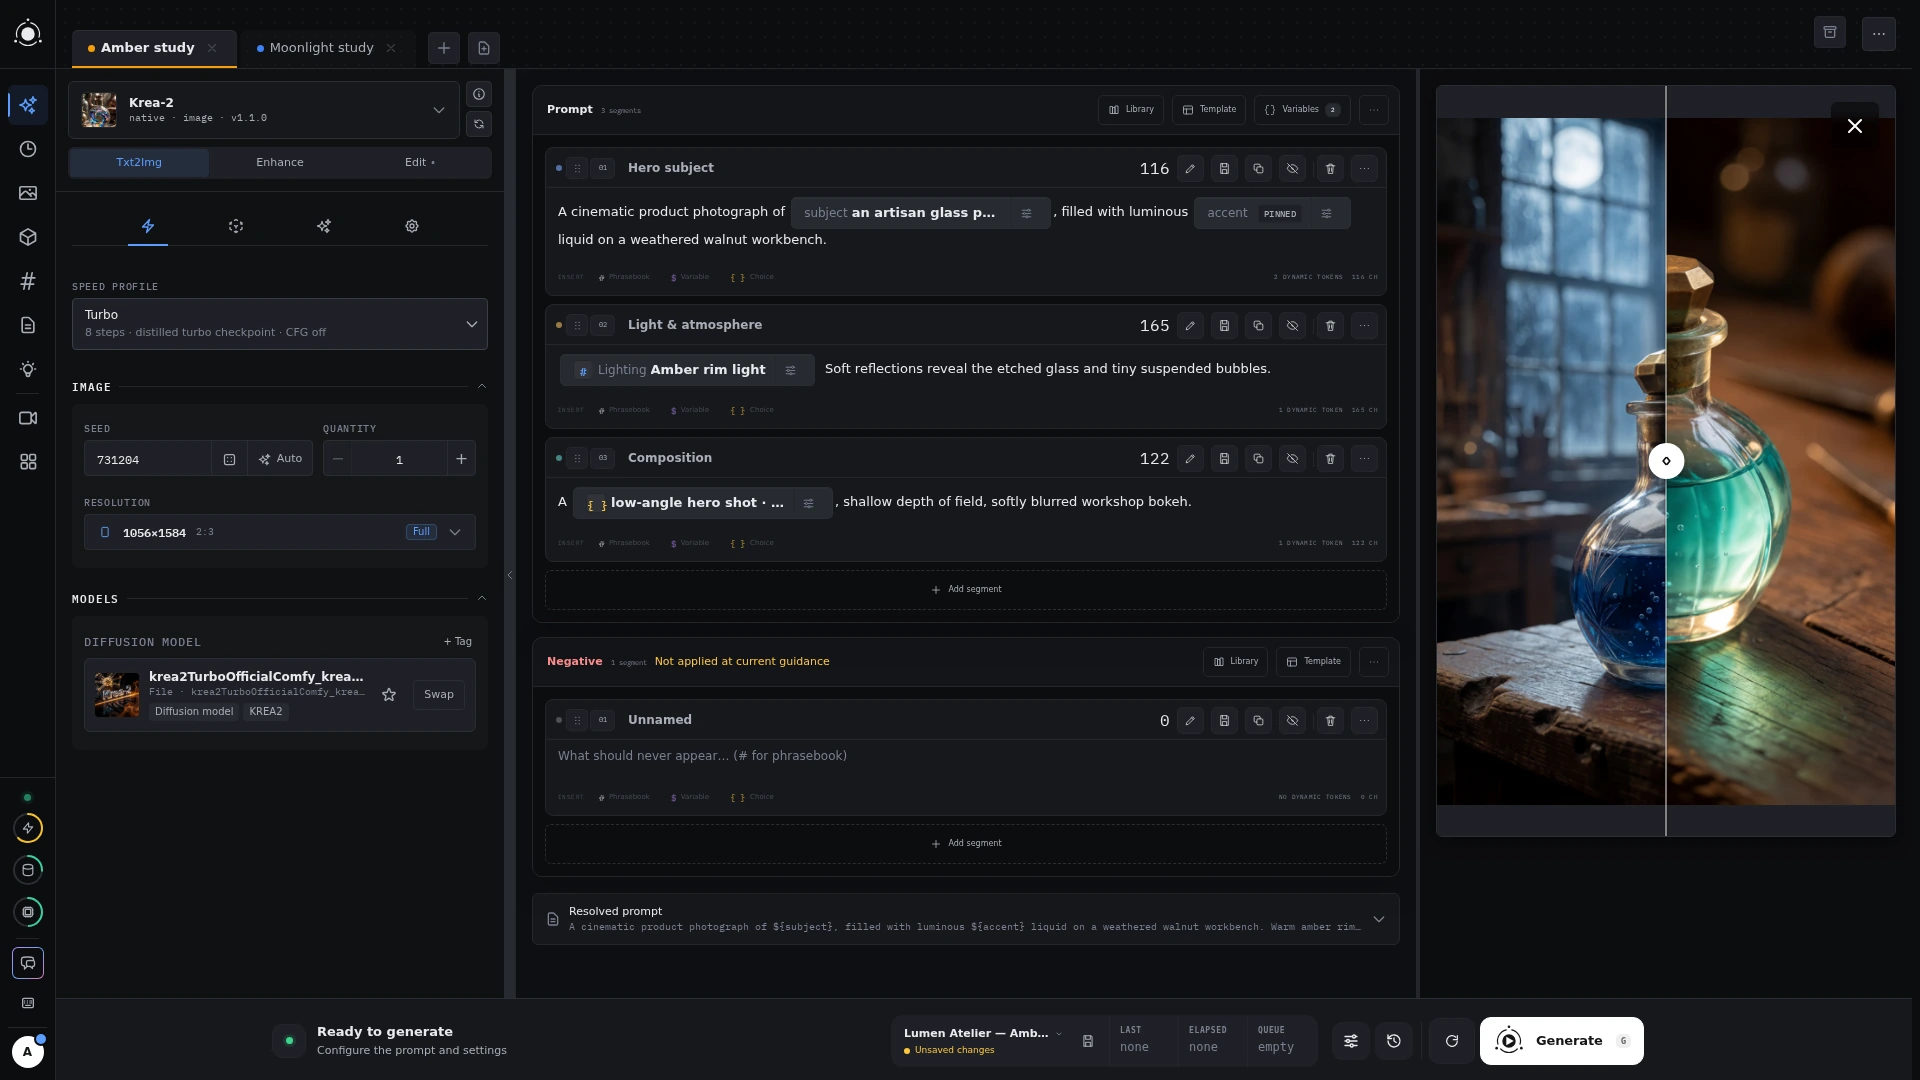 Comparing results in the Workbench
03 / Create
Presets & forms
The right controls for the model you’re using.
What a preset gives you
A preset connects a generation pipeline to a purpose-built form. It defines supported modes, required models, controls, and defaults. Choose an installed preset to start creating; authoring your own is optional.
| Mode | Use it to… |
|---|---|
| Text to image | Create an image from a written description. |
| Image to image | Transform an input image using a prompt and the available strength controls. |
| Inpaint | Edit a masked region of an image. |
| Enhance / upscale | Increase resolution or refine an existing result. |
| Video, audio, or 3D | Work with a preset designed for that medium. |
Each preset offers its own subset of modes. A field may appear only after you enable a related option.
Understand common controls
- Resolution: image dimensions or a named aspect ratio supported by the preset.
- Steps: how many sampling steps a run uses. Follow the preset’s defaults before tuning.
- Guidance / CFG: how strongly the model follows the prompt, where supported.
- Seed: a starting value for randomness.
-1requests a fresh seed; History records the actual value used. - LoRAs: compatible add-on models for a style, character, or subject, with individual strength controls.
Shape a preset’s form
Administrators can change defaults, lock settings, or hide fields in an installed preset. For a custom tool, authors define fields in form.yml and connect their values to processing steps in pipeline.yml.
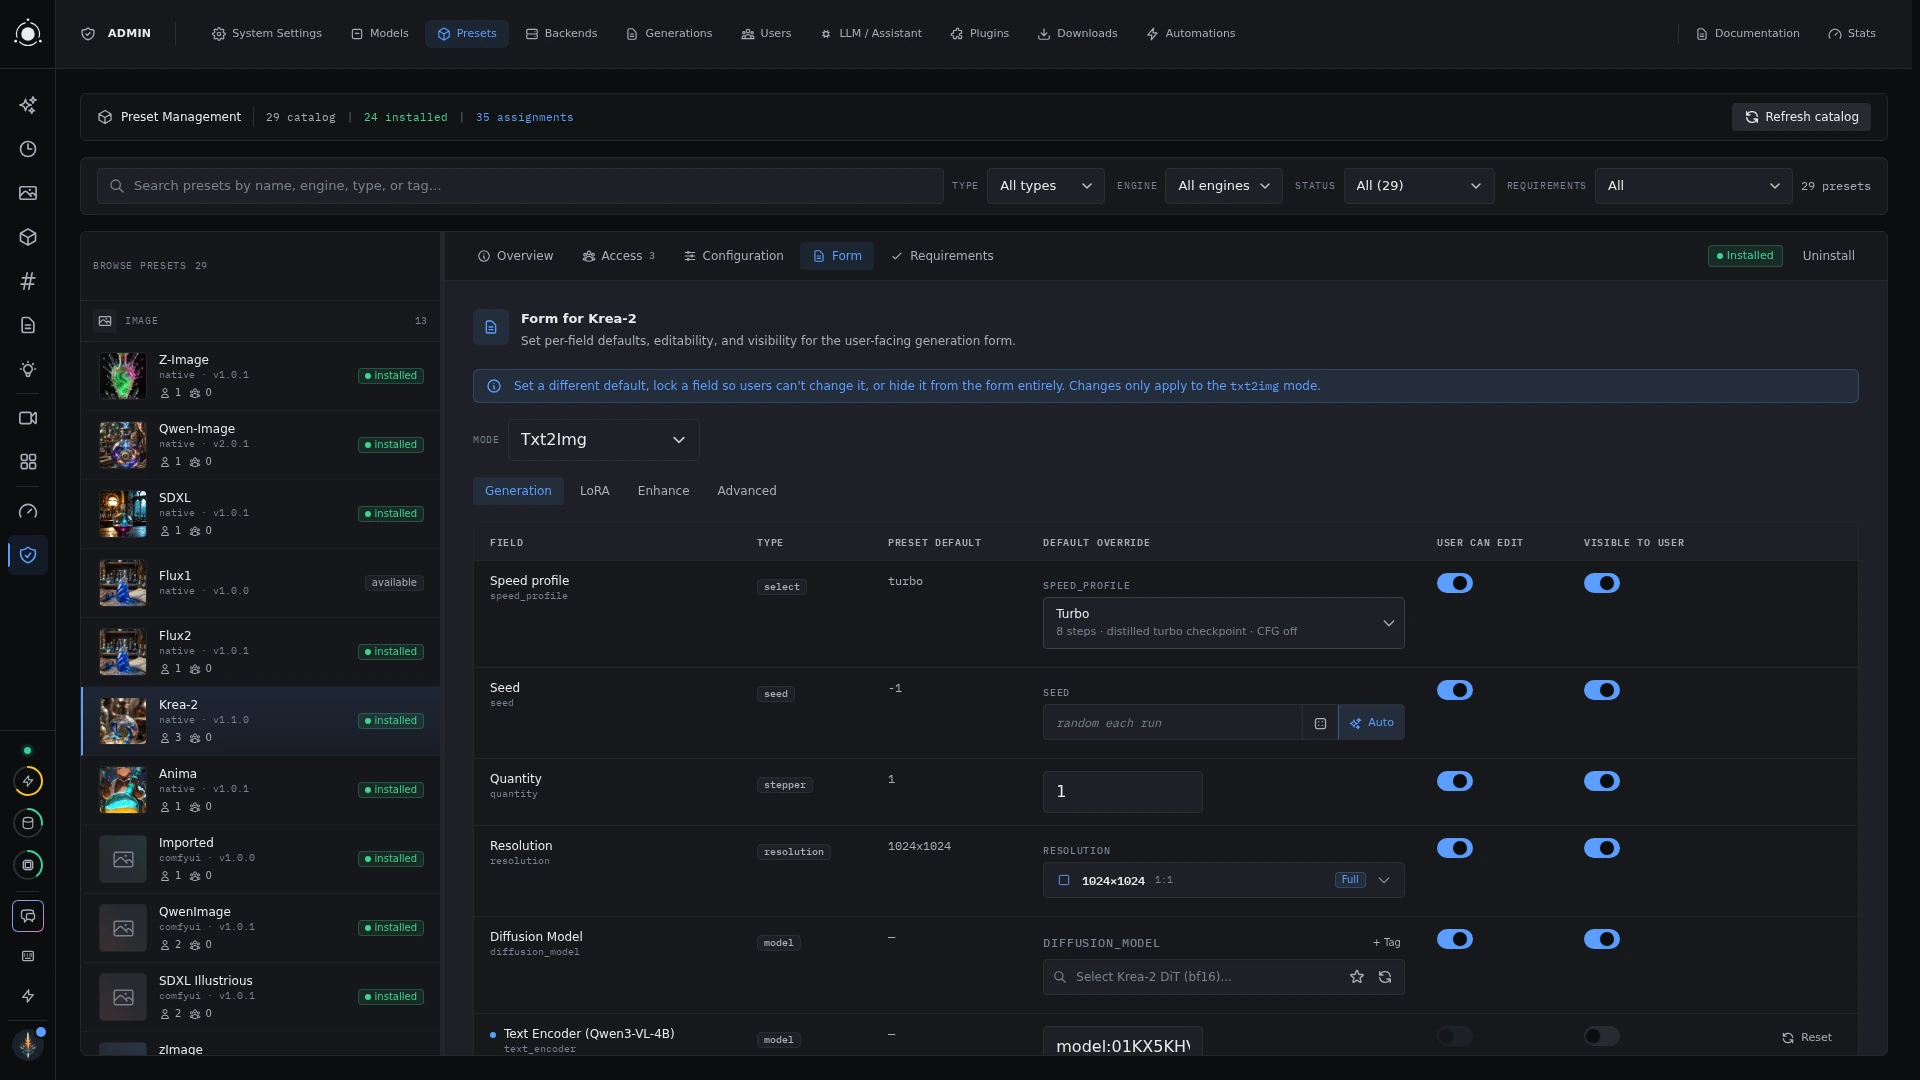 Customizing a preset form
04 / Create
Video Director
Think in shots. Give each moment its own direction.
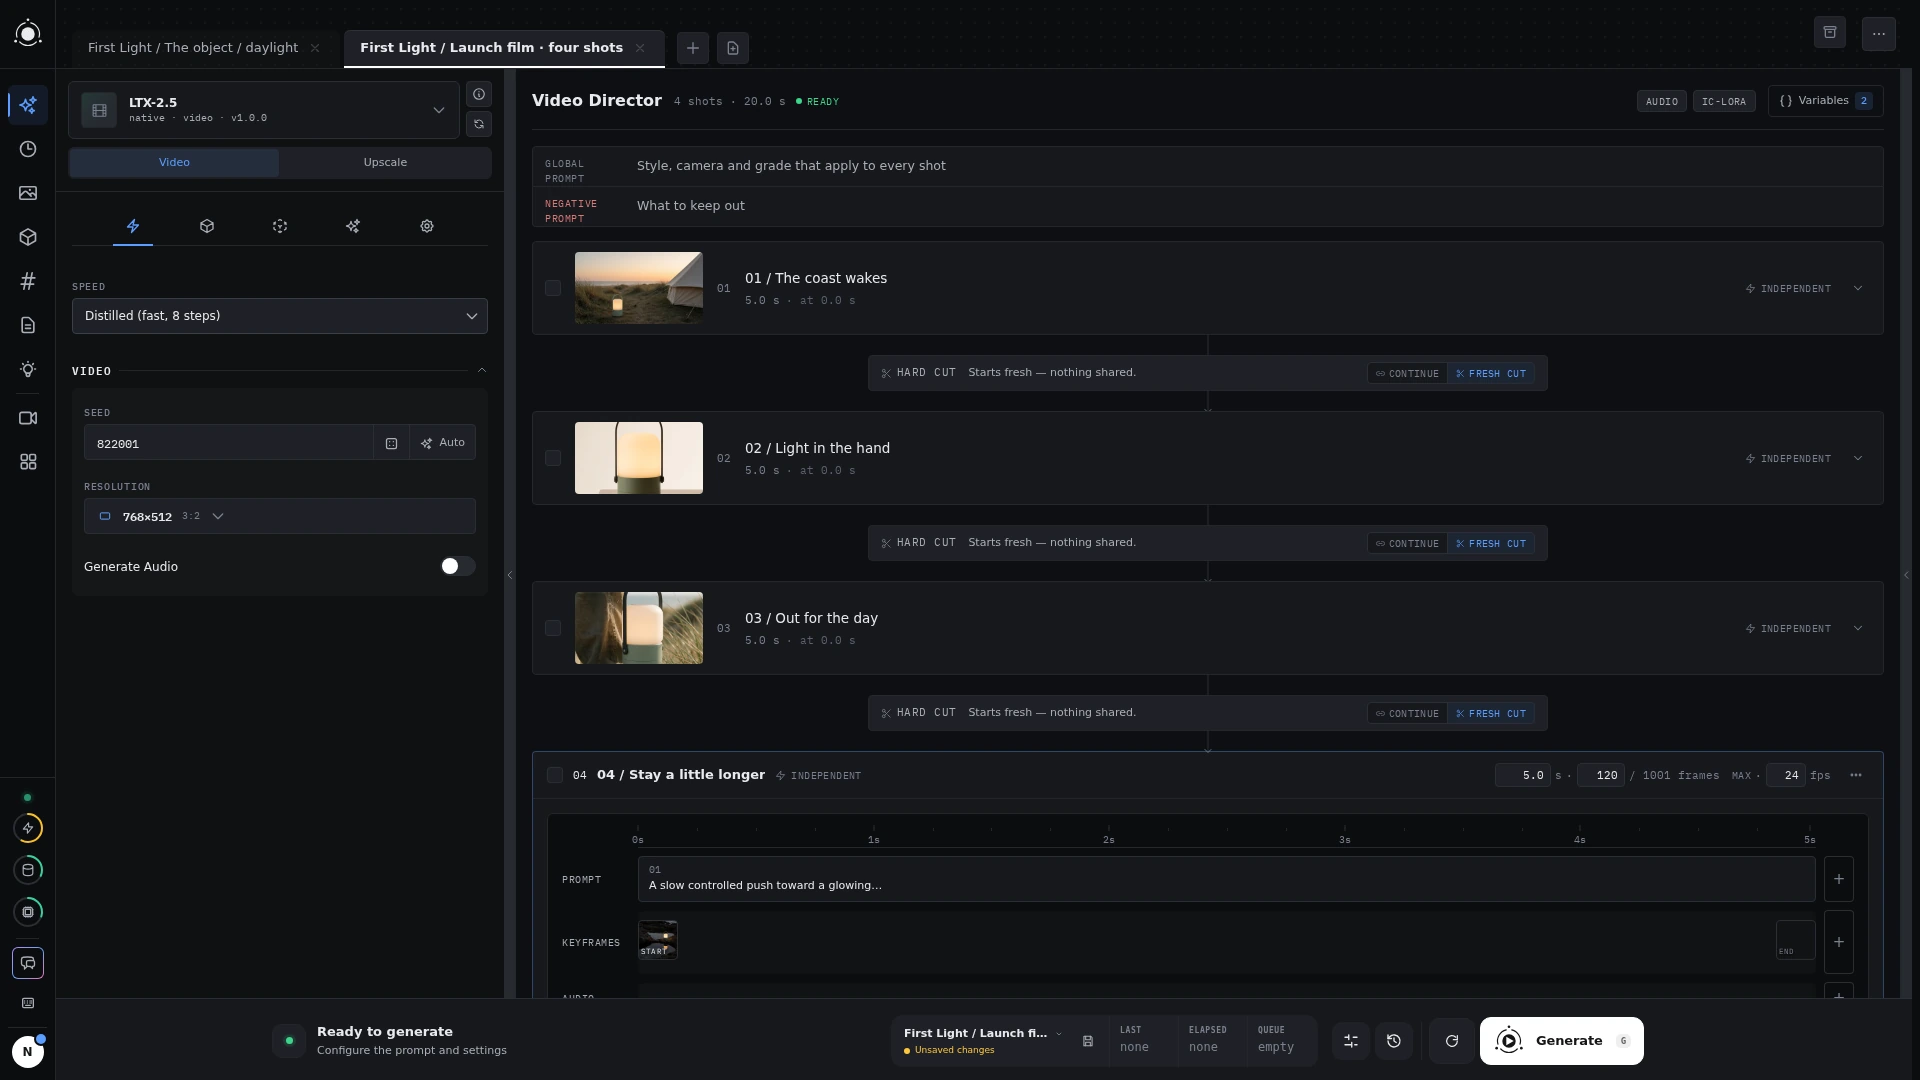 Video Director
Choose how a clip begins
Compatible native video presets can offer text-to-video, image-to-video, first-and-last-frame, and Director modes. Use a written brief, a starting image, or a pair of frames as your starting point. The selected preset determines which modes and controls appear.
Build the direction
Use the familiar segment editor for global direction and individual beats. In a timeline-style preset such as LTX, each shot has its own duration, timed prompts, and supported keyframe or audio inputs. Shots generate separately in order.
Chain-style presets such as Wan connect sequential segments using a tail-frame handoff. A continuation in the LTX editor instead uses the previous shot’s rendered output as a starting frame; that output needs to exist before the next shot can run.
Keyframes, audio, reference conditioning, and duration limits vary by model. LTX and MiniMax-H3 integrations are experimental. Check the model guide before planning a render.
05 / Create
Beyond the image
Explore sound and shape through the same preset-driven studio.
Music Experimental
The MiniMax-Music3 song preset combines lyrics in the prompt editor with a Style description in the form. Describe genre, tempo, mood, vocal character, and arrangement. Keep verses and choruses in reusable prompt segments, or enable Instrumental for a track without vocals.
The duration control sets a maximum, rather than an exact target. Song structure and lyrics influence the natural ending. Required audio models and their hardware demands are separate from image generation.
3D from a reference
The TRELLIS.2 preset turns a reference image into a 3D mesh. Open mesh results in History to inspect materials and wireframes. This is a separate generation task with its own models and input requirements.
06 / Compose
Prompts & segments
Build an idea in pieces. Keep the pieces that work.
Four related tools
The Prompts workspace contains four libraries. They share the same rich segment format, including text, phrasebook chips, enabled state, and optional names, colors, and descriptions.
- Prompts
- Complete ordered compositions. Save a finished product brief or a negative prompt for another generation.
- Segments
- Single named, categorized cards. Reuse a character description or a lighting direction by replacing one editor card.
- Segment Templates
- Ordered sets of slots, with optional starter content. Start a new brief with subject, setting, lighting, and camera cards already arranged.
- Segment Categories
- Names and colors that organize saved Segments, such as Product, Lighting, or Camera.
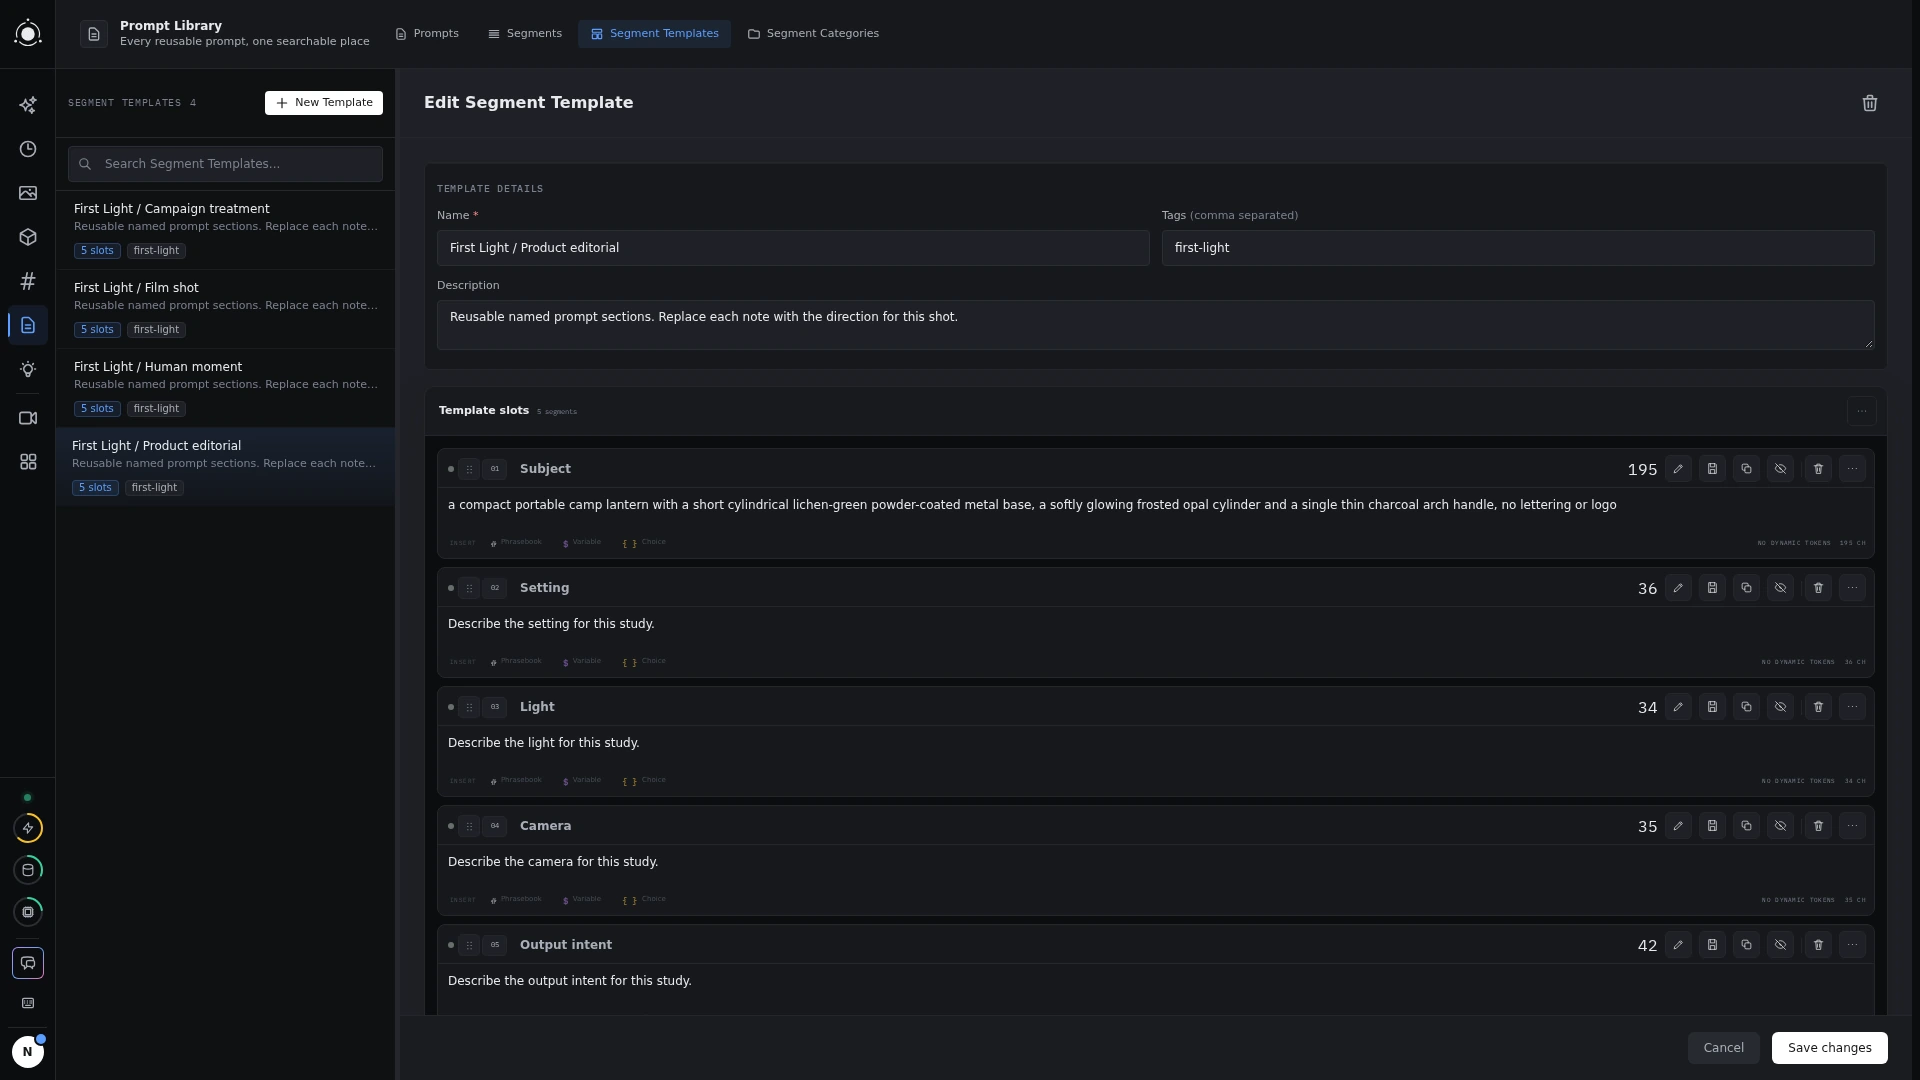 Segment Templates
Save and apply a composition
Use Save as Prompt on a whole list or Save as Segment on one card. When applying a Prompt or Template, choose Append, Prepend, or Replace. Replacing meaningful content asks for confirmation.
Inserted cards are independent copies. Editing them doesn’t update the saved item. Applying a library item changes only the prompt list you target; use a session to preserve the preset, mode, and form as well.
Arrange the idea
Reorder, duplicate, or disable cards as you refine a prompt. Collapsing a card only folds the editor; disabling excludes it from the generated prompt. Positive and negative lists remain independent.
07 / Compose
Phrasebook
A vocabulary for your work, always within reach.
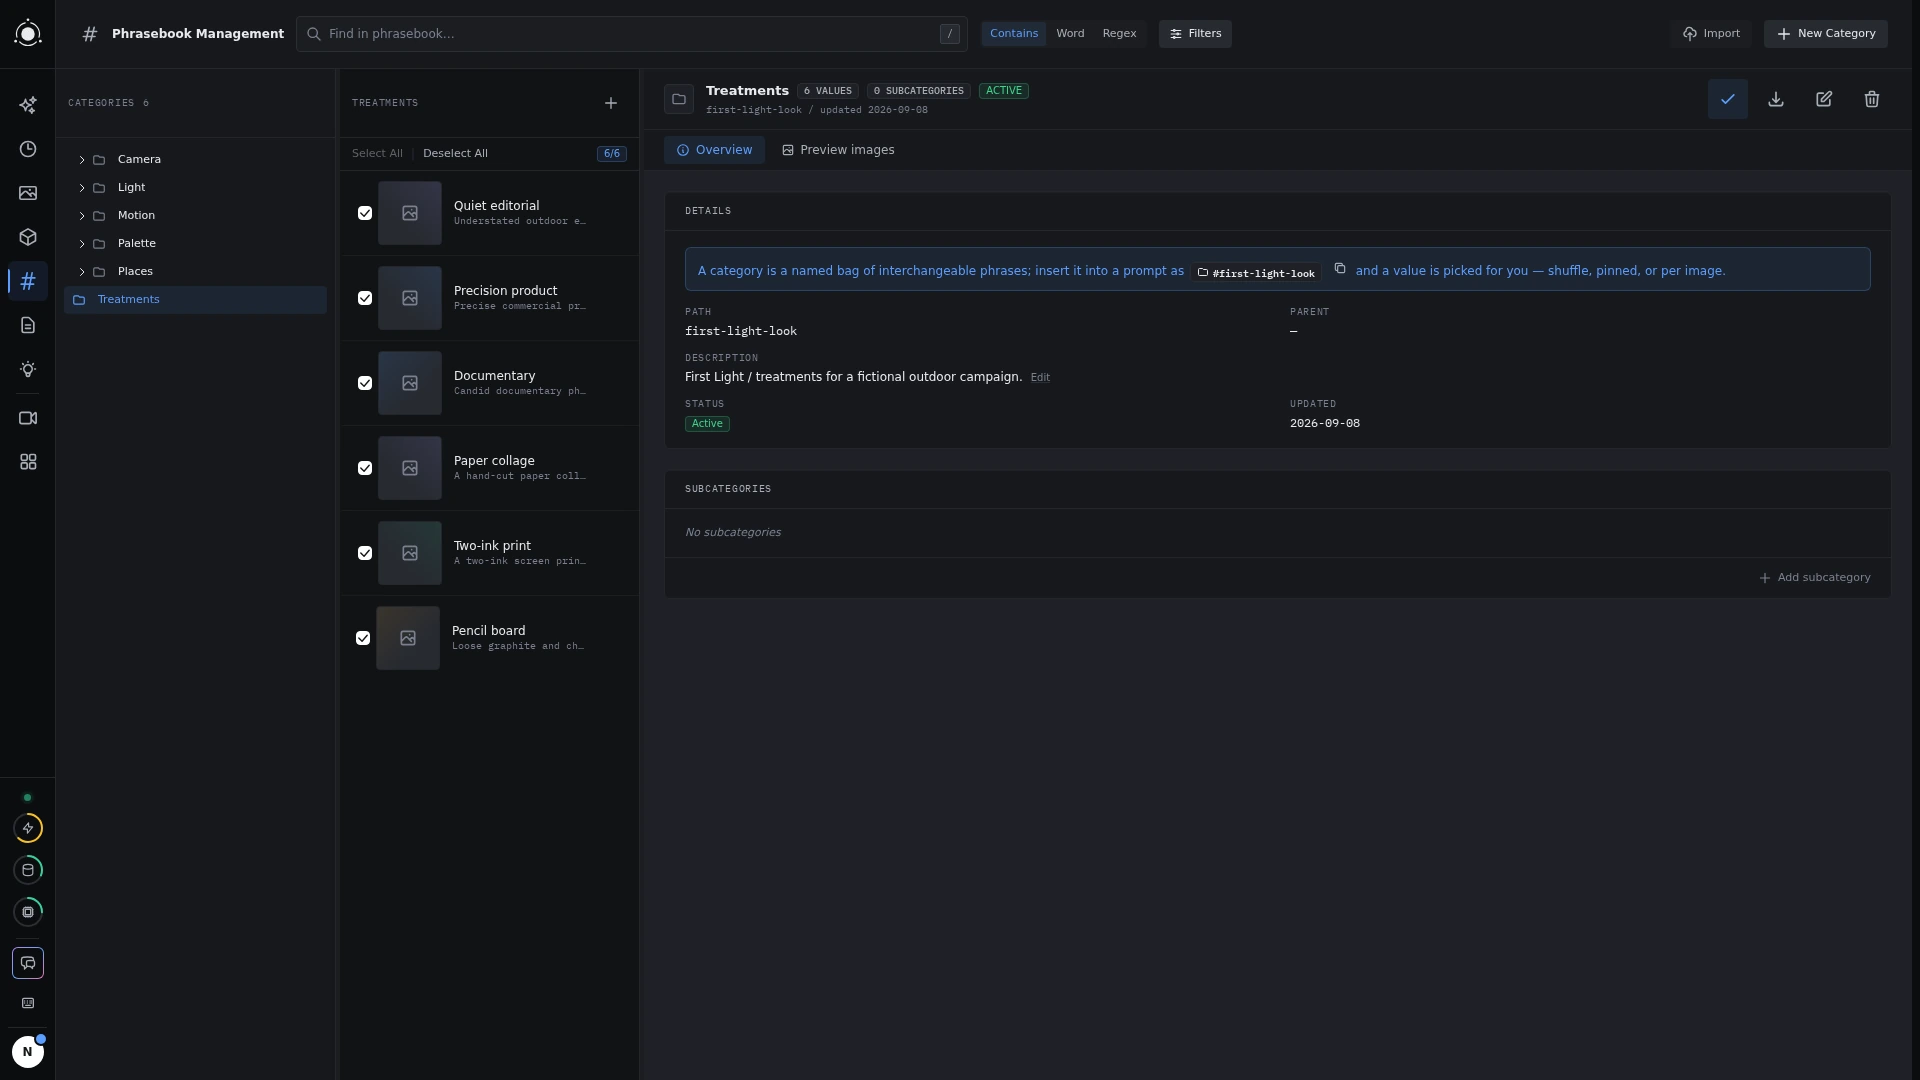 The First Light phrasebook
Build your vocabulary
Create categories for terms you use often, with nested categories for a larger collection. Each value has a short label and the actual text inserted into your prompt. For example, a “Soft daylight” label can stand for a more detailed lighting description.
Manage categories and values in Phrasebook. Mark entries active or inactive, and filter the tree to focus on the ones you use. A configured assistant can help refine the inserted text.
Insert, pin, or shuffle
Use # in a prompt to find phrasebook suggestions. Accept a suggestion to insert a chip, then choose a specific value or enable shuffle to explore alternatives from that category across generations.
Saved Prompts, Segments, and Templates retain chip selections and shuffle settings. Generation details record the resolved composition, so you can see which wording a result used.
08 / Compose
Variables & choices
Keep a detail consistent, or leave room for a useful surprise.
Define a detail once
Variables are named values scoped to a Generate tab. Put a repeated product description in a variable, then insert its chip wherever you need that description. Updating the variable changes what those references resolve to.
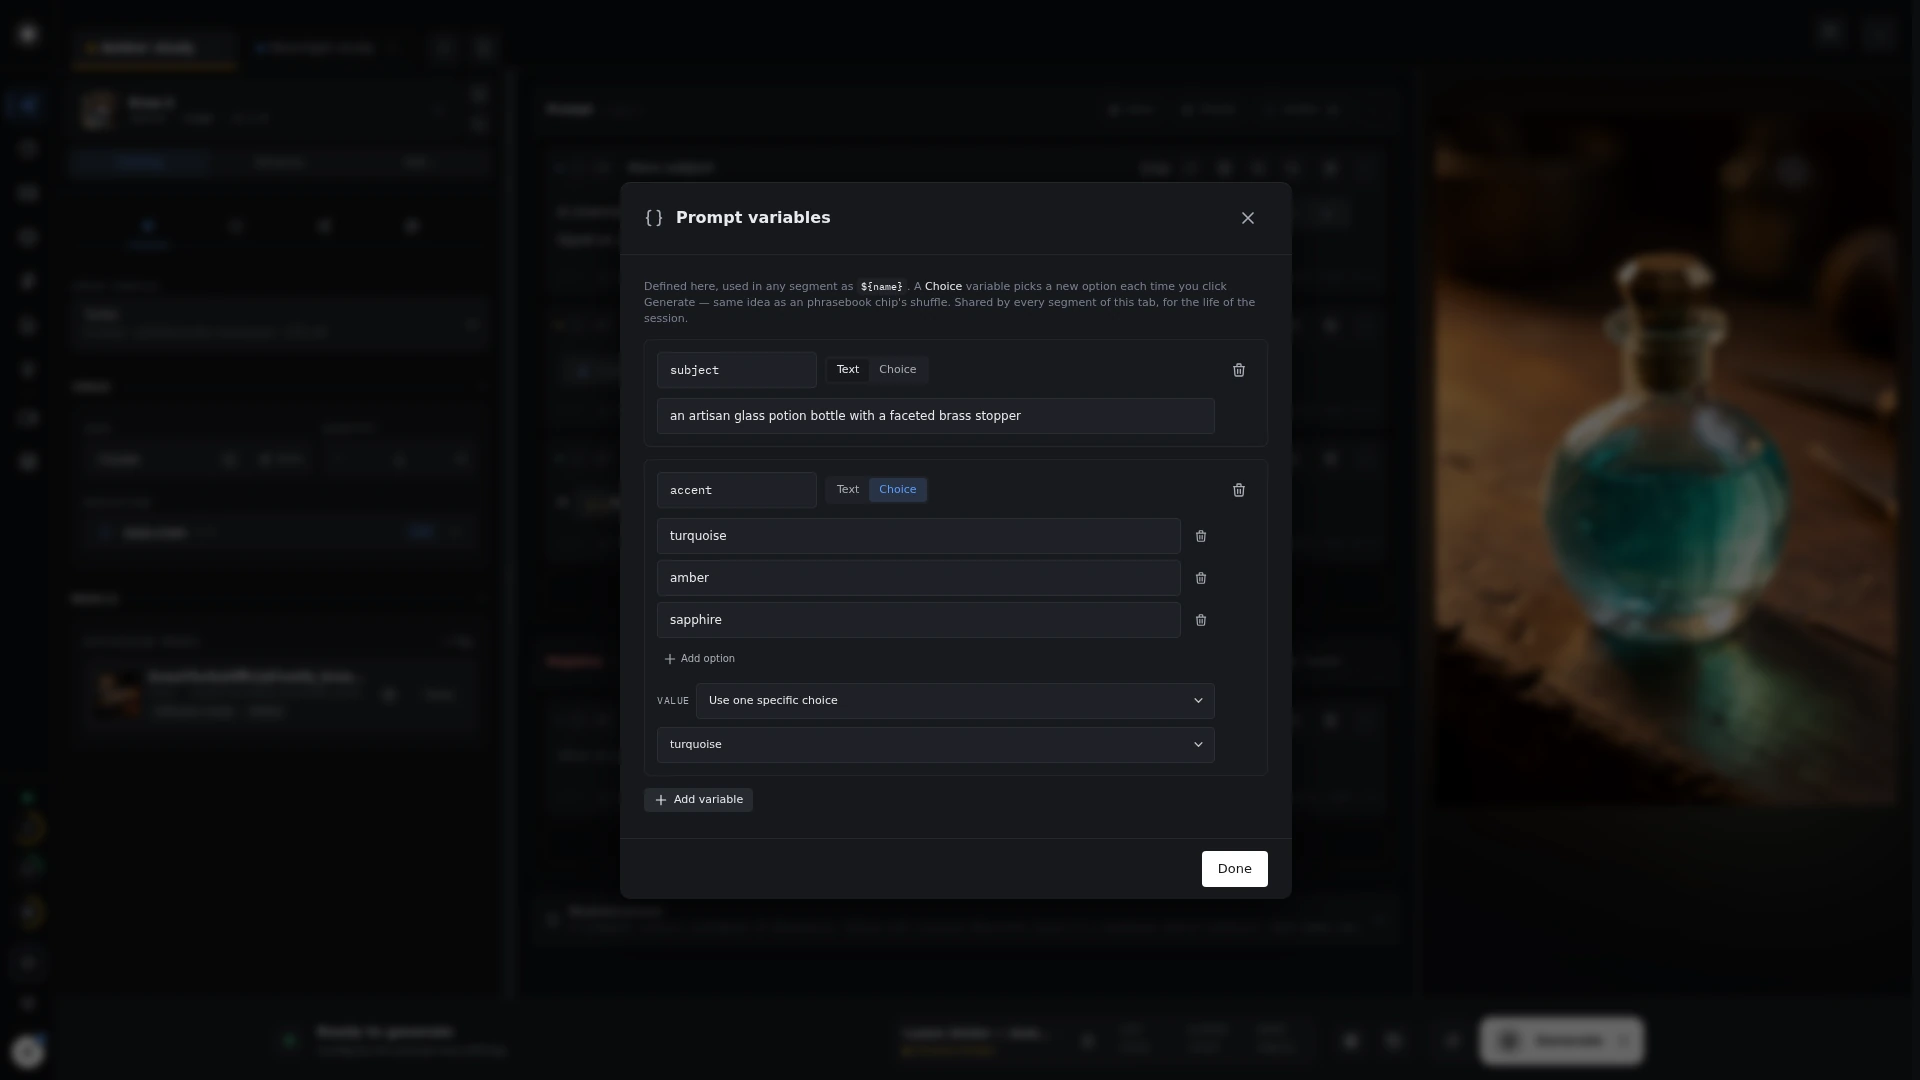 Prompt variables
Explore alternatives
Choice chips select from alternatives, including weighted choices and multiple selections. The editor manages these as chips; the underlying syntax also works when importing or copying prompts.
${product} in {daylight|moonlight}
{0.7::warm light|0.3::cool light}
In the first example, ${product} inserts a defined variable and the choice supplies one lighting direction. The second example gives warm light a higher selection weight. Check variable names: an undefined variable resolves to empty text.
09 / Compose
AI assistant & MCP
An optional collaborator beside your creative tools.
Work with the assistant
Once an administrator configures a language model and gives you access, open the chat panel to brainstorm, expand a prompt, or refine a segment. Choose among available models and modes, or attach an image when the model supports vision.
Enable Tools to let the assistant propose actions, such as updating prompt text, form settings, or phrasebook values. Changes in the built-in chat wait for your approval. With Tools off, the assistant replies with text. Pin a conversation to a tab to keep its actions aimed at that workspace.
Conversations have their own saved sessions. Use /help for built-in commands or /tools to inspect available tools.
Connect an external client
MCP, the Model Context Protocol, lets a compatible external client work with your PotionUI account. An administrator must enable MCP for the instance and your user. Create a named token in Settings → MCP, copy it when shown, and connect to your server’s /api/mcp endpoint using bearer authentication.
Keep it private and revoke it in Settings when no longer needed. External clients handle their own action approvals; changes do not open a second approval prompt in PotionUI. Tools requiring a live Generate editor are unavailable through MCP.
10 / Organize
Workspaces & sessions
Leave an idea open. Come back with a fresh eye.
Keep ideas side by side
Each workspace tab holds its own preset, mode, prompt composition, form values, and results. Add a tab with the plus button and switch between ideas without replacing their setups. Tabs are remembered between visits.
Save a setup by name
Use a session to save the whole creative setup: preset, mode, prompts, and form values. Name sessions for a direction you want to return to, such as “Product / daylight” or “Launch film.” Restore one when you want to continue that setup.
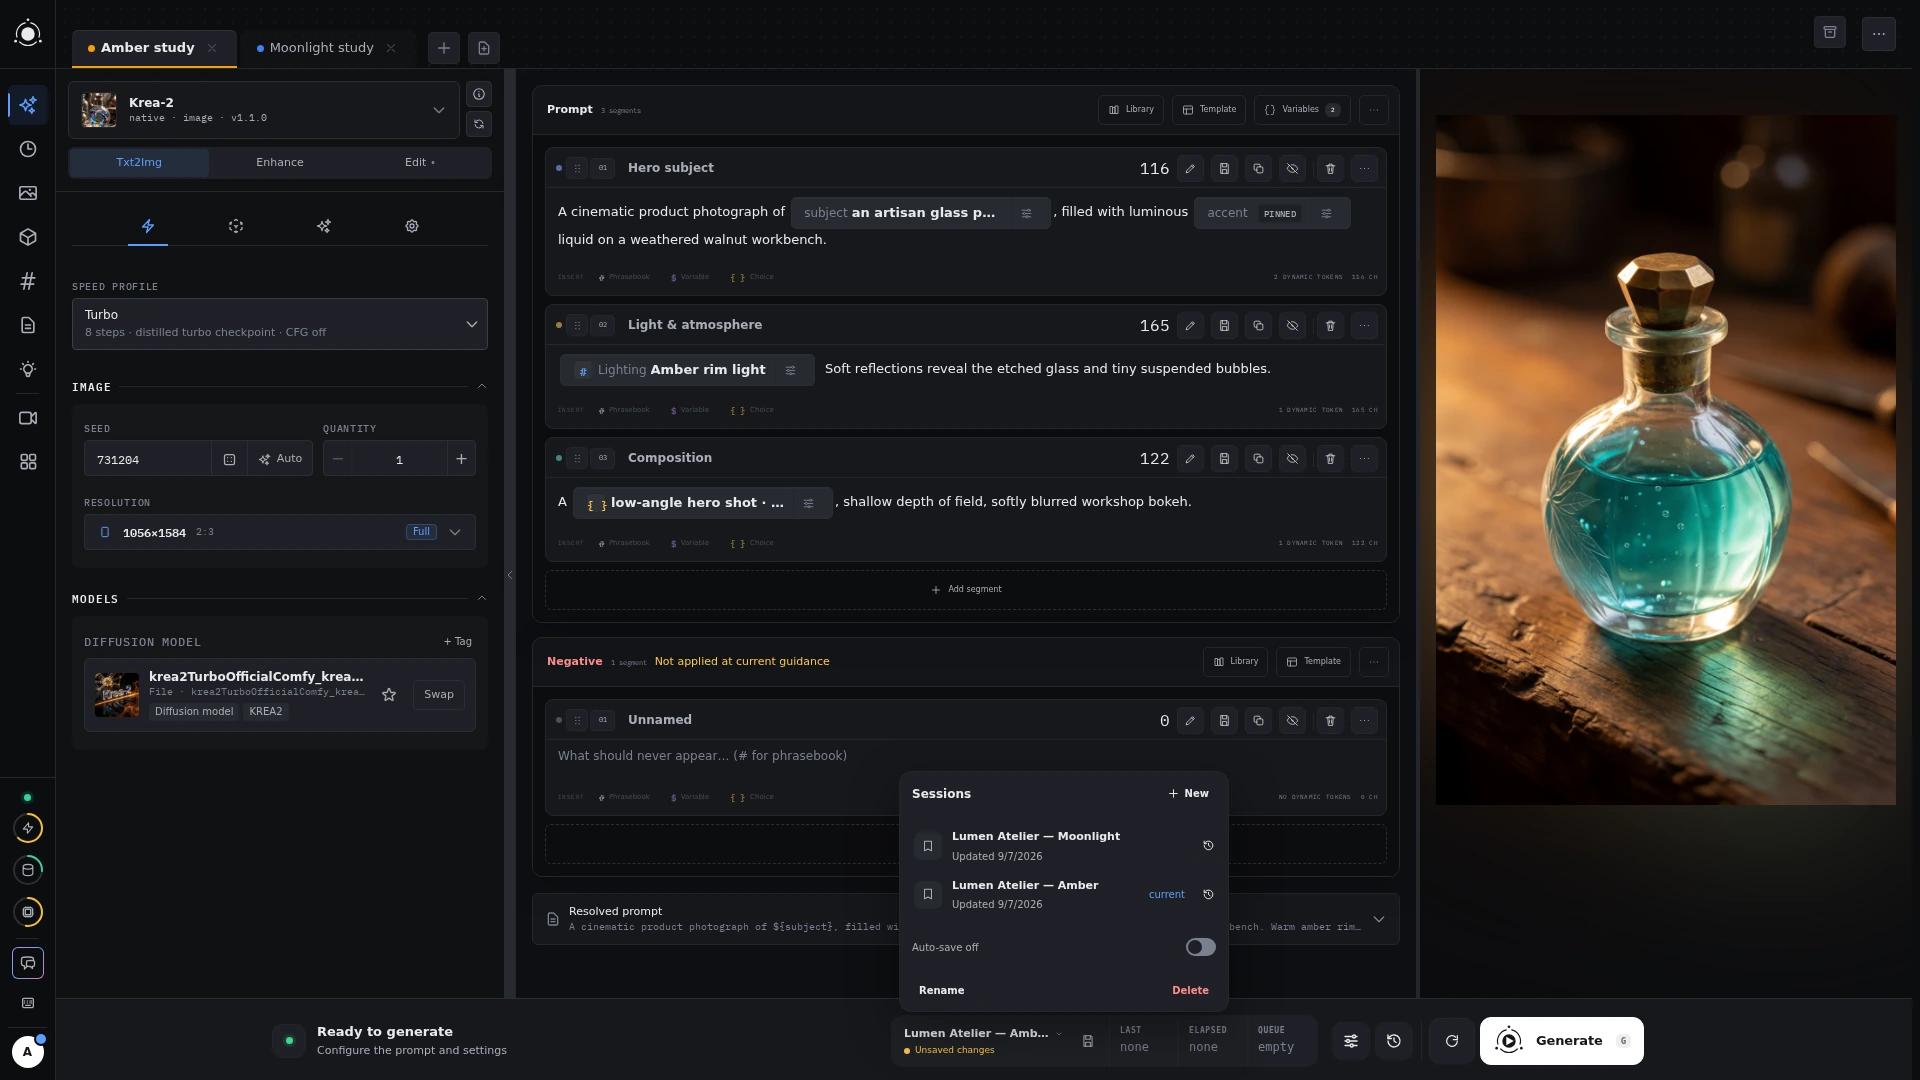 Saved generation sessions
A Prompt saves composition. A Session saves the generation setup. History keeps the actual run and its recorded result.
11 / Organize
History & collections
The result is only half the story. Keep its recipe, too.
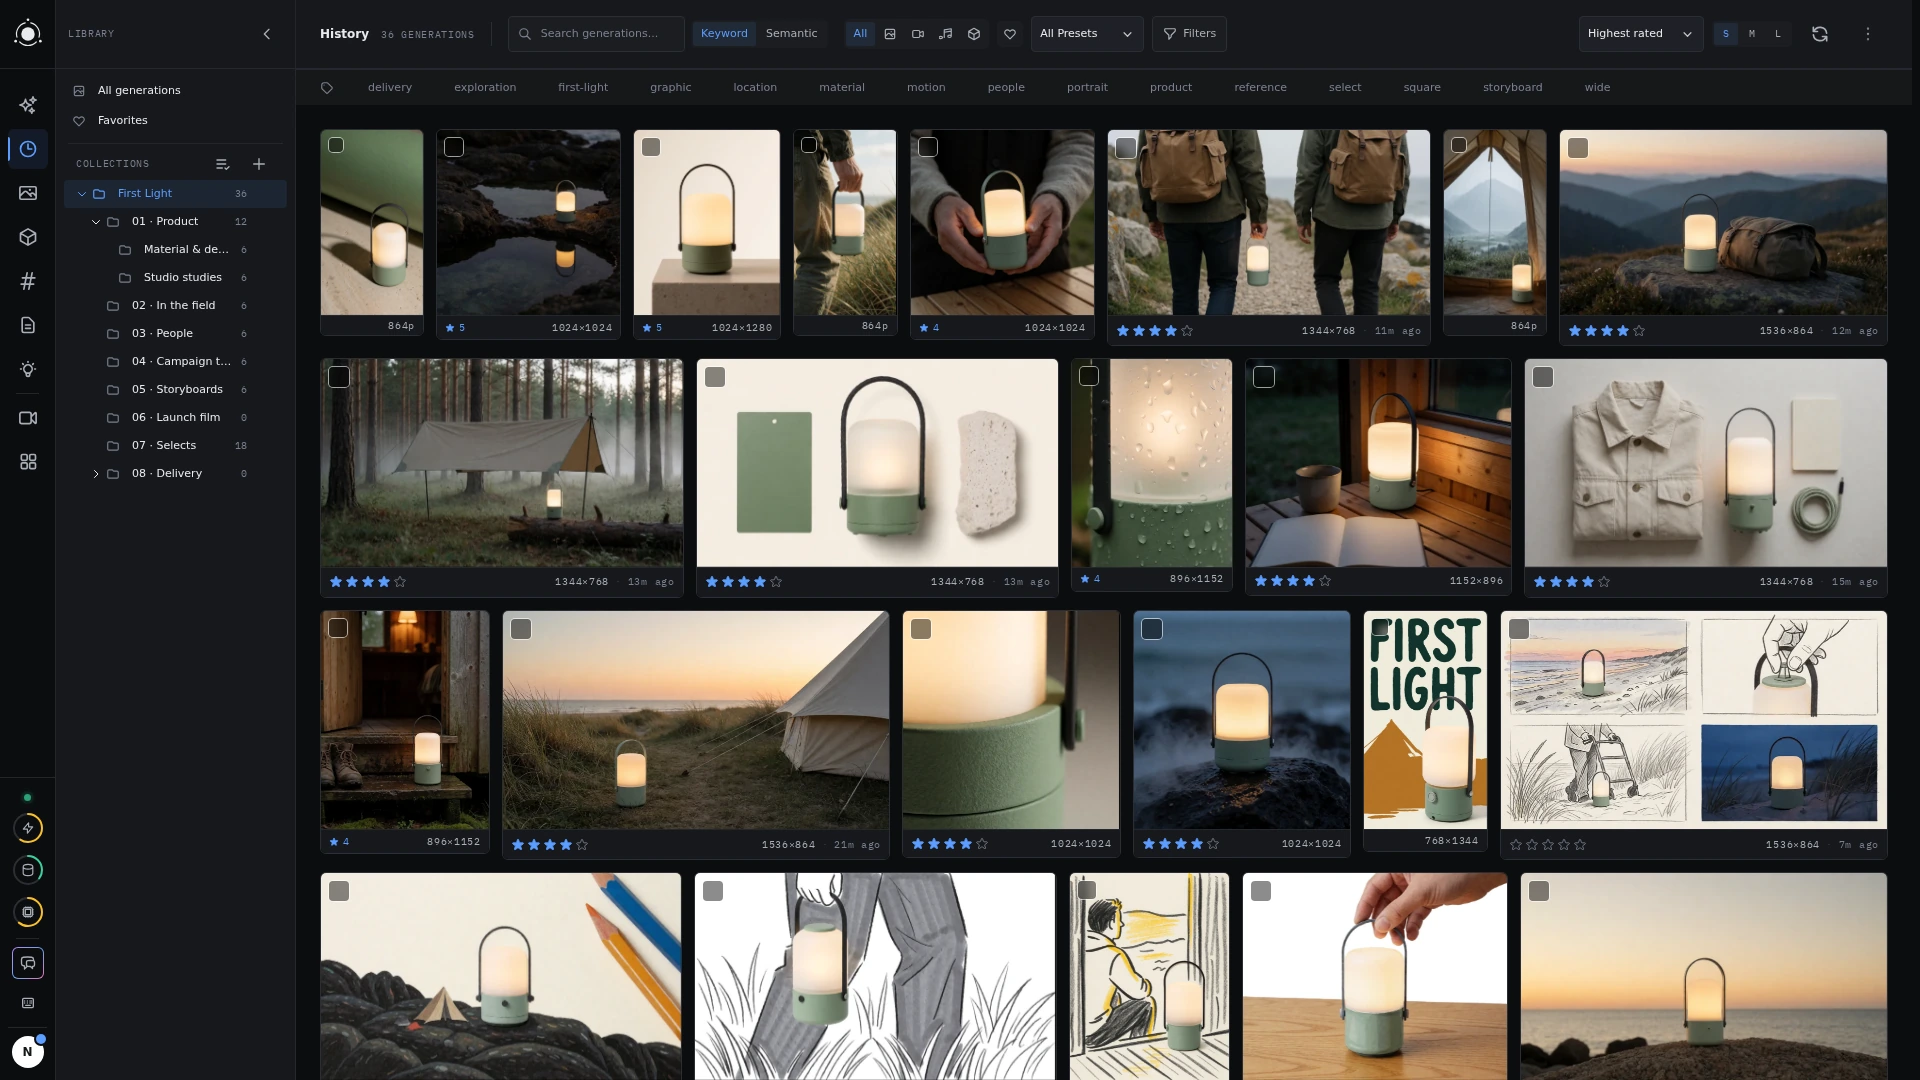 History and project collections
Find the right run
History automatically records generations. Search prompt text and narrow by date, media type, status, preset, mode, or model. Phrasebook filtering helps find runs that used a particular saved value.
Use tags for labels that cross projects, such as “select” or “needs review.” Use collections to gather related work into a project structure. Combine filters to find a particular direction without paging through every experiment.
Recover the recipe
Open a generation’s details to inspect the recorded prompt composition, resolved phrasebook values, seed, dimensions, preset version, model files, and parameters. Reuse that setup as a starting point for another variation.
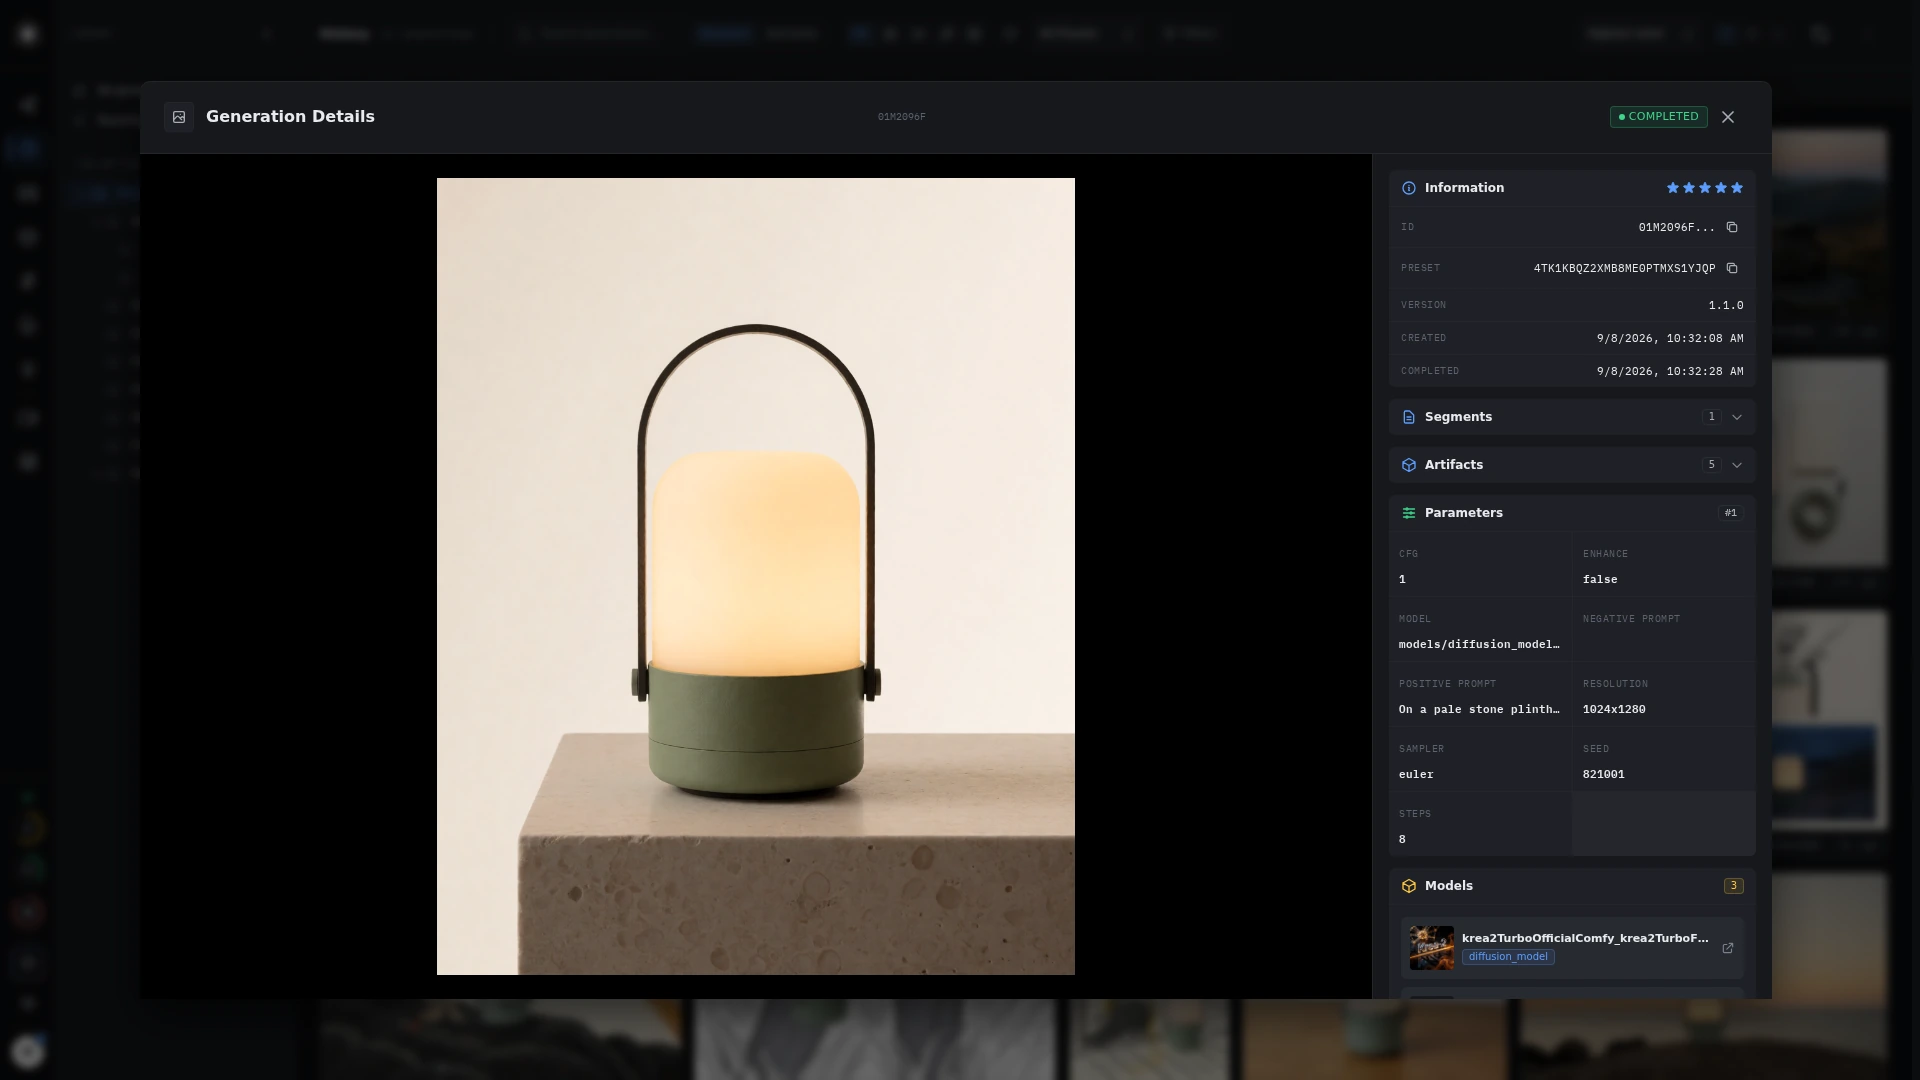 Generation details
Keep the useful work
Select results for bulk tagging or cleanup. Deleting generations is permanent and asks for confirmation. Check the selection and filters before confirming, especially when deleting by tag.
12 / Organize
Library & Inspirations
Give your next idea a useful starting point.
Build a reference library
Keep reusable media in the Library, upload reference files, and arrange them in collections. Gather product images, locations, character references, or the starting frames for a film in one place.
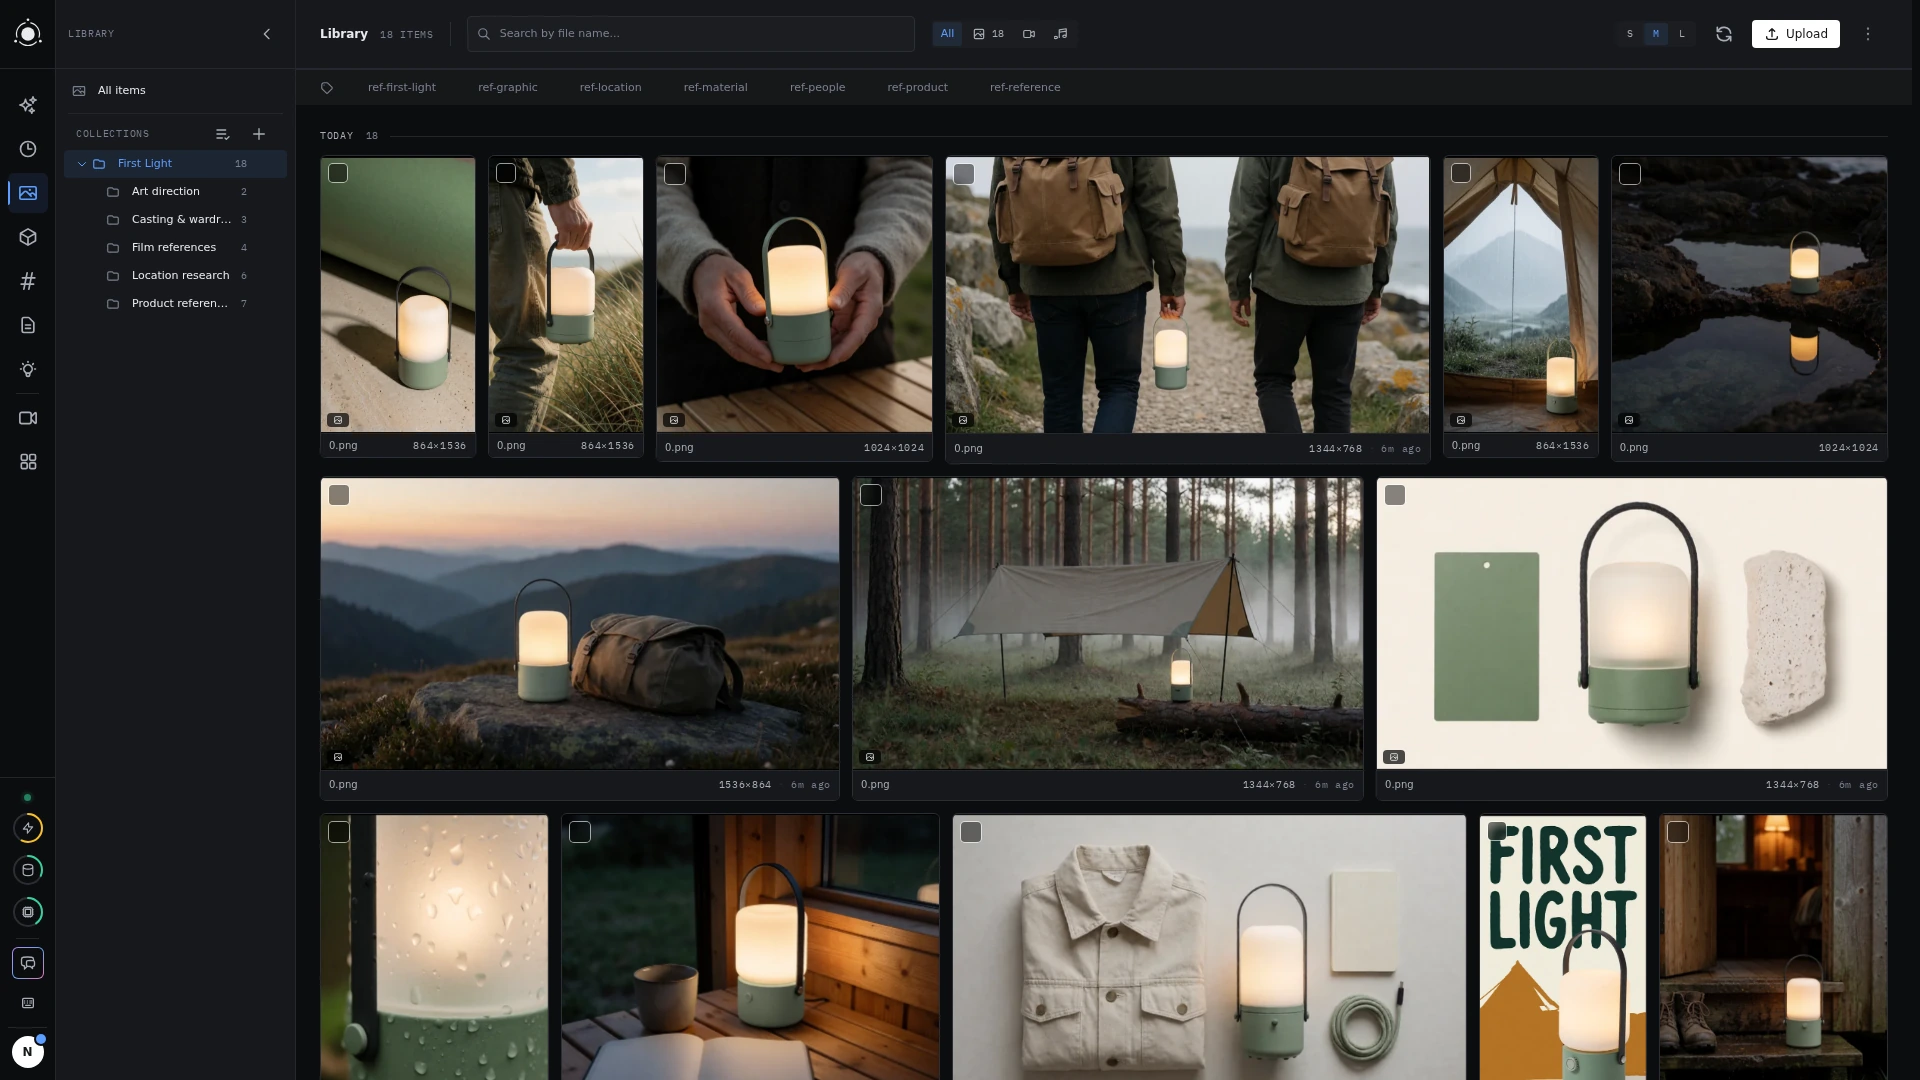 The creative Library
Share the thinking
Inspirations brings selected work and its creative direction into a browsable studio collection. Inspect a useful example, save it as a reference, or take its generation recipe into a new exploration.
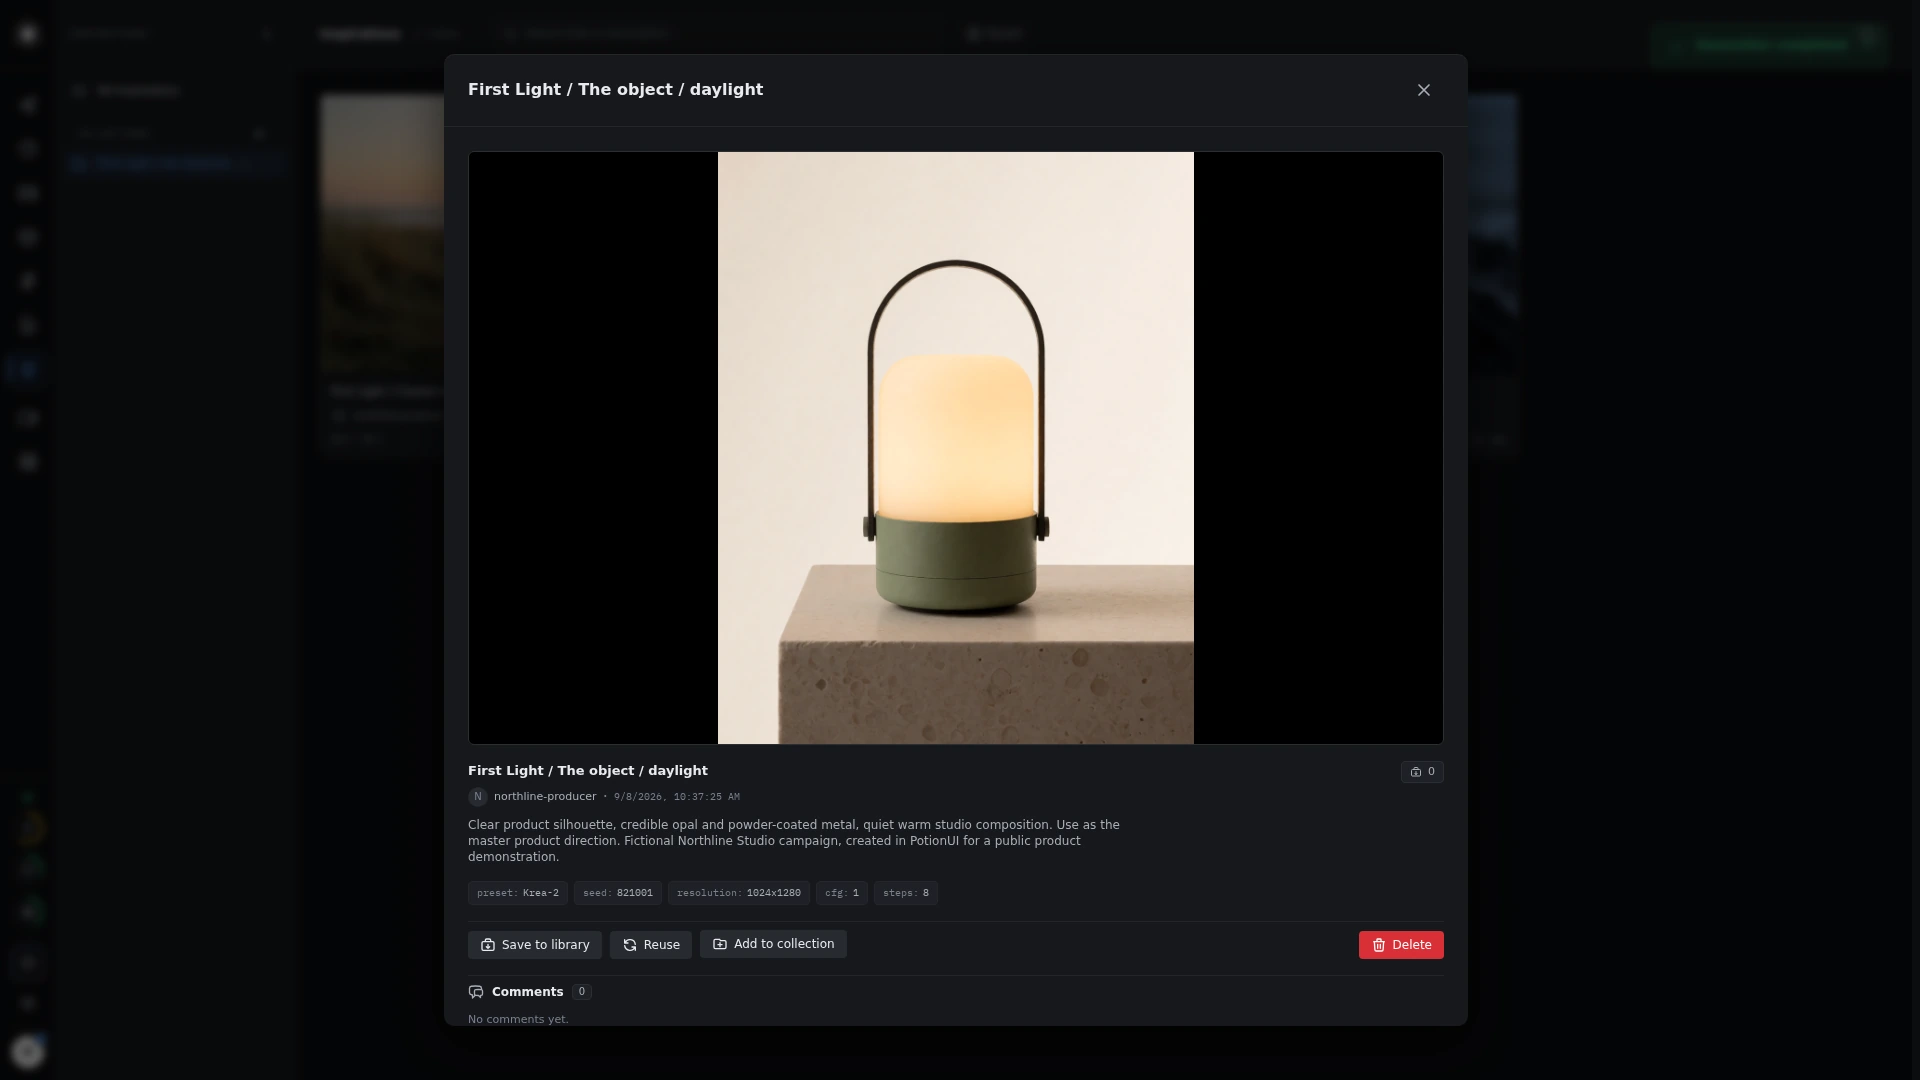 Studio Inspirations
13 / Make it yours
Models & backends
Choose the tools. Choose where the work happens.
Know what’s installed
Models is the inventory of actual model files: base checkpoints, LoRAs, text encoders, VAEs, and upscalers. Filter by type, tag, or name. Open a model to inspect its size, details, previews, and generations made with it.
A preset’s model pickers show compatible files available to your account. Administrators manage downloads and assignments. Provider plugins can add metadata and download links from external catalogs.
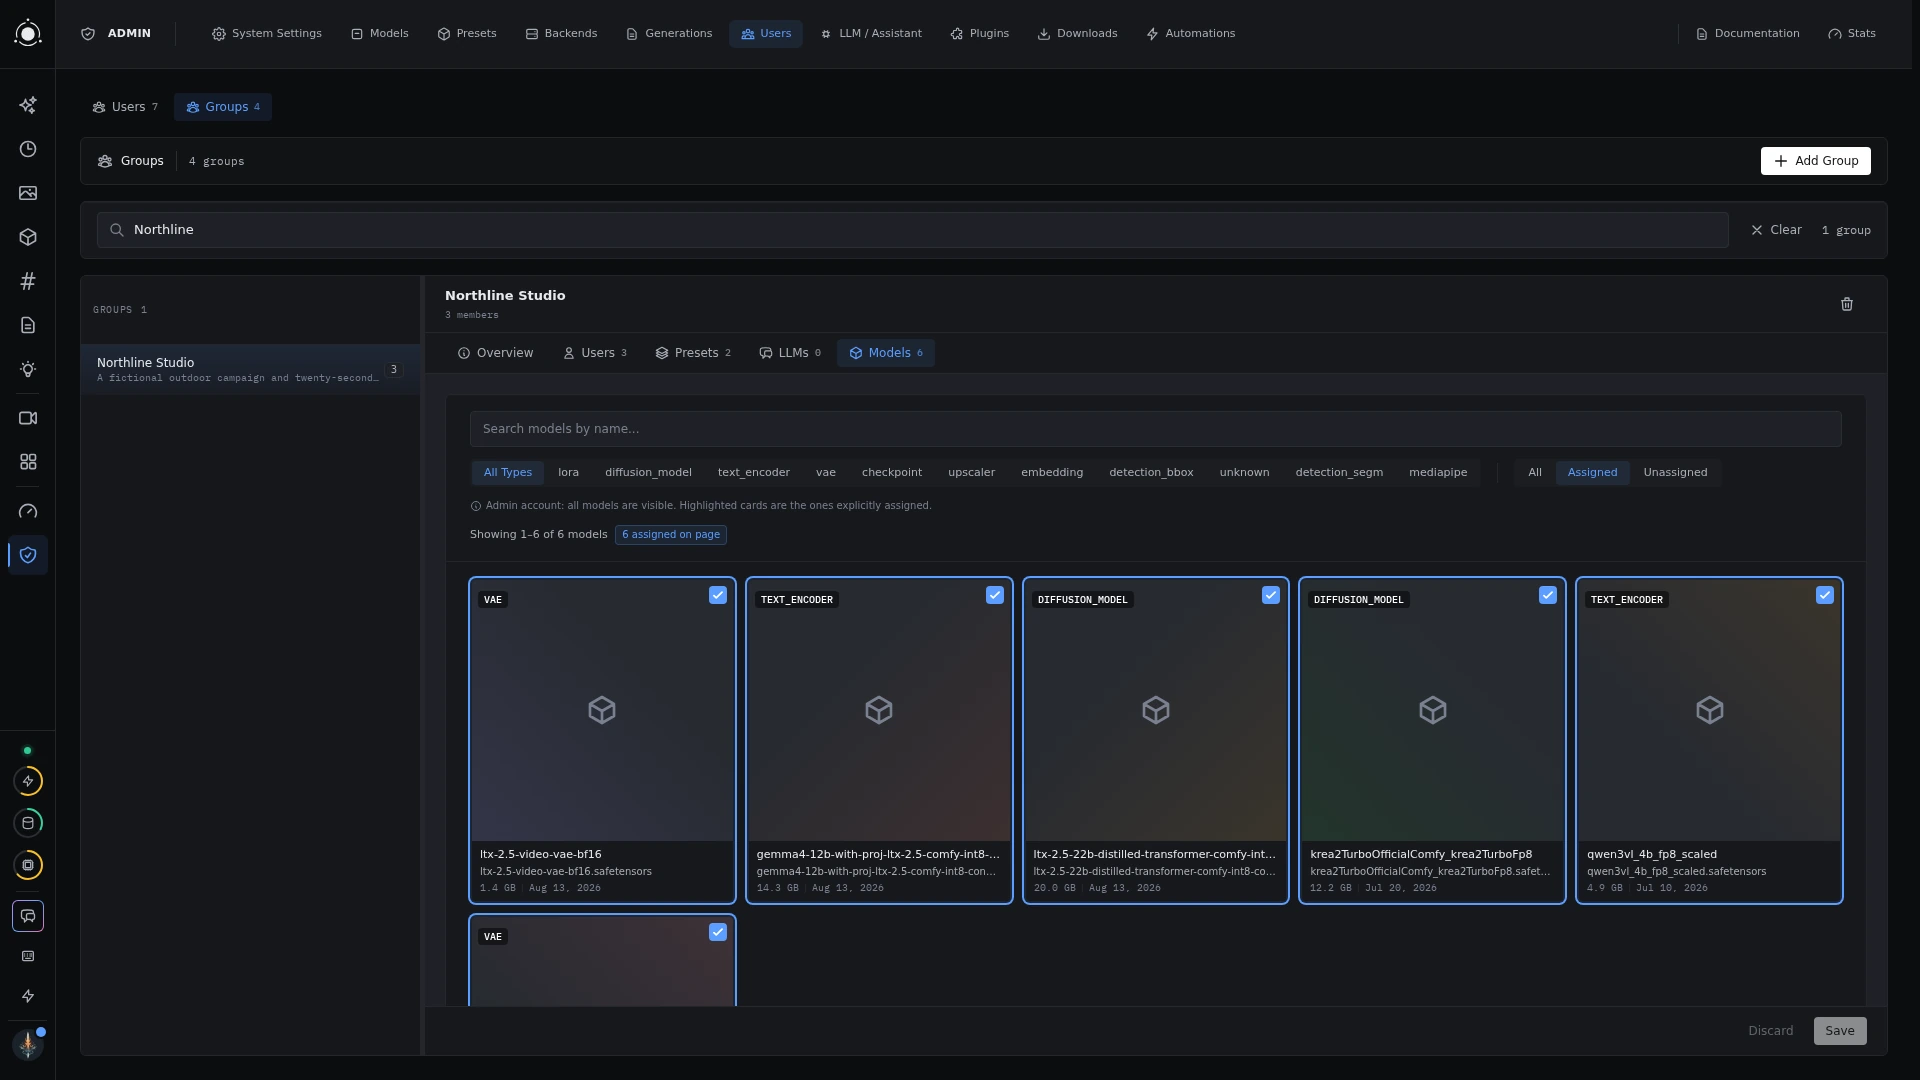 Model management
Connect the compute
An engine is the kind of pipeline a preset runs. A backend is a configured place that runs that engine. Native presets can run locally or on a compatible remote native worker; ComfyUI presets require a configured ComfyUI server.
Administrators configure and enable backends, connection details, and applicable device settings. A preset needs a backend that speaks its engine’s protocol. A remote setup lets the browser-facing studio and GPU worker live on different machines.
Memory needs vary by model, resolution, and workflow. Weights download separately and carry their own licenses. Use the hardware guide for model-specific requirements and validation status.
14 / Make it yours
Studio administration
One installation. The right tools for each person.
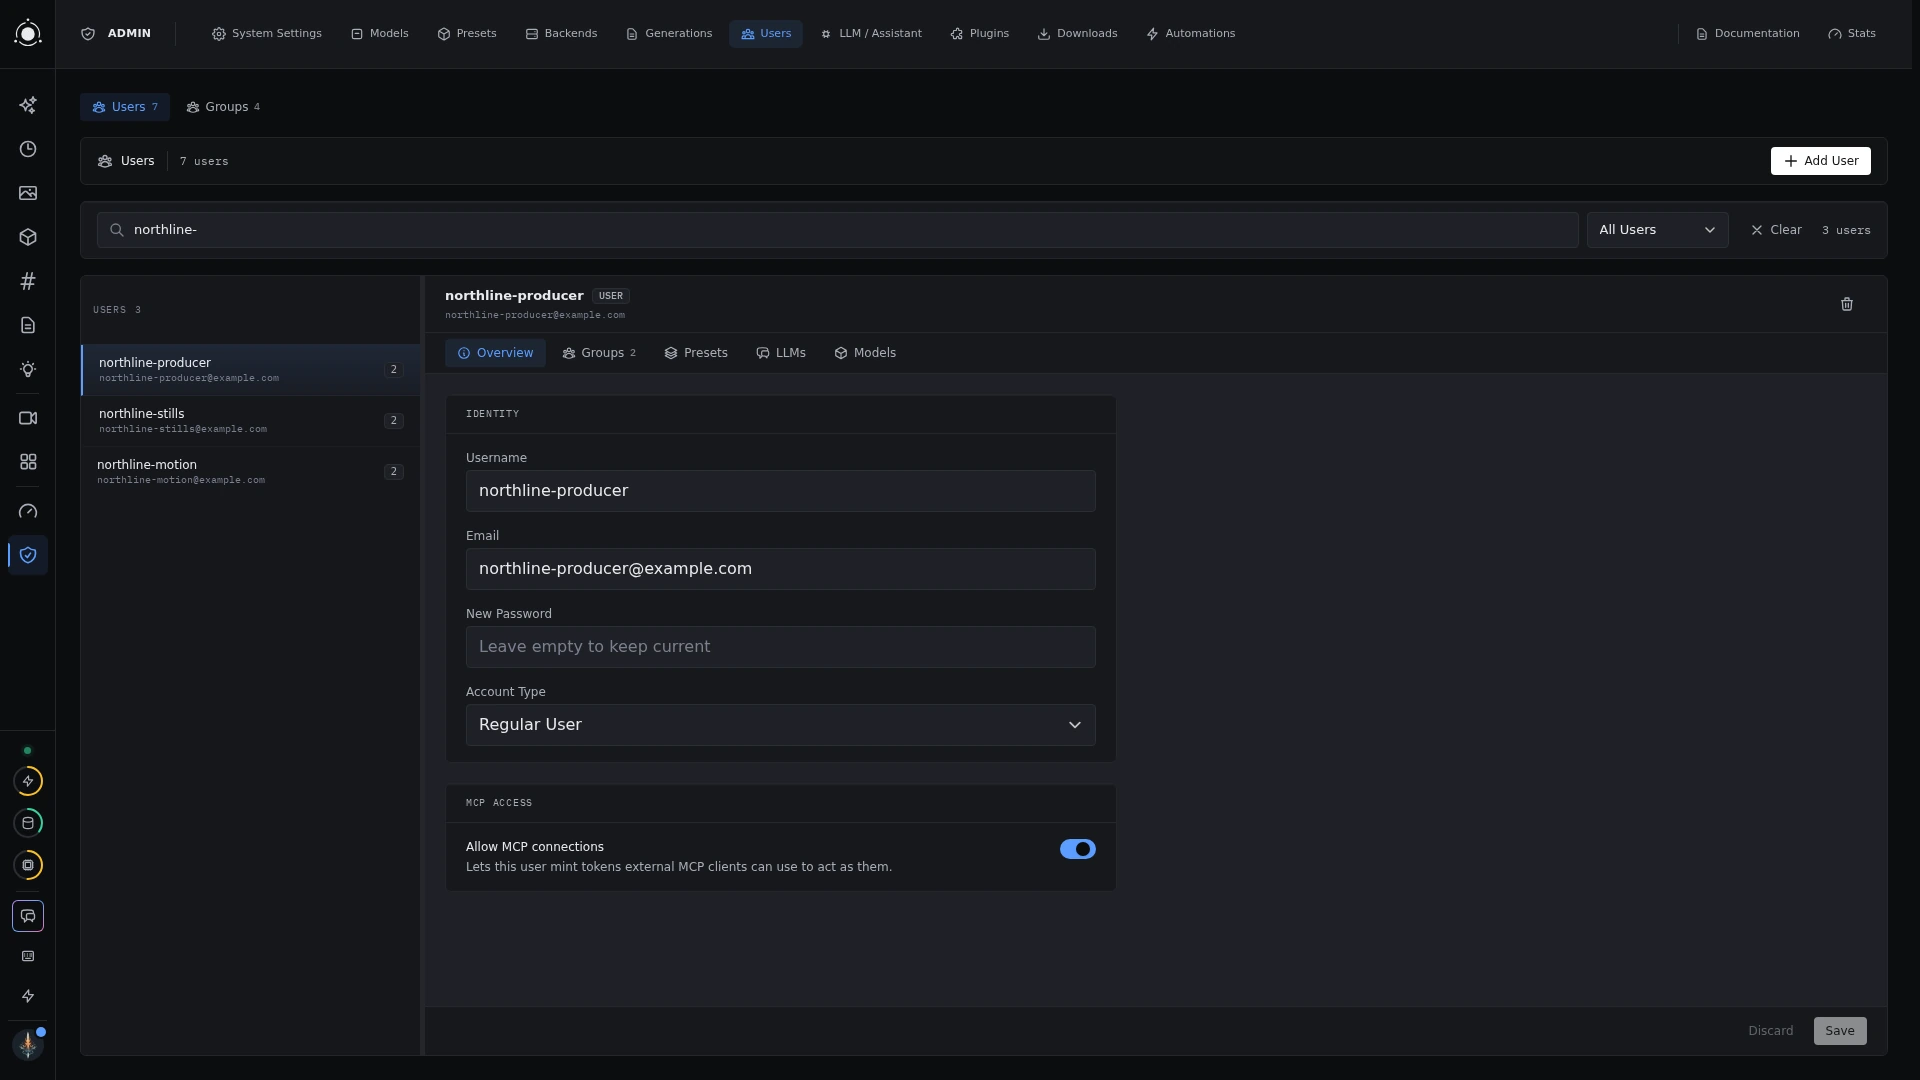 Users and access
Manage people and access
Administrators create accounts, set roles, and organize people into groups. Assign presets, model access, and assistant configurations to individuals or groups. A shared group makes it easier to give a team the same tools.
Regular users see the resources assigned to them. Administration is available to accounts with admin rights. The exact features a person sees also depend on enabled plugins and server configuration.
Maintain the installation
- Presets: install tools, manage access, and customize form defaults and visibility.
- Models & backends: manage files, downloads, compute connections, and device options.
- LLM configuration: connect supported providers or native checkpoints, then assign access.
- System settings: configure storage, thumbnail profiles, housekeeping, and backups.
Back up your studio
Use Administration → System Settings → Backups to configure backup options and run a backup. Restoration is a command-line task with the app stopped. Check the backup guide for what each tier includes, model-file handling, and restoring onto a fresh installation.
15 / Make it yours
Automations
Set up the routine around the creative work.
Connect a trigger to an action
The visual automation editor connects triggers through conditions to actions. Triggers can include a schedule, a manual run, a file watcher, GPU memory thresholds, or application events. Actions can organize results, assign resources, index models, control backends, or send notifications.
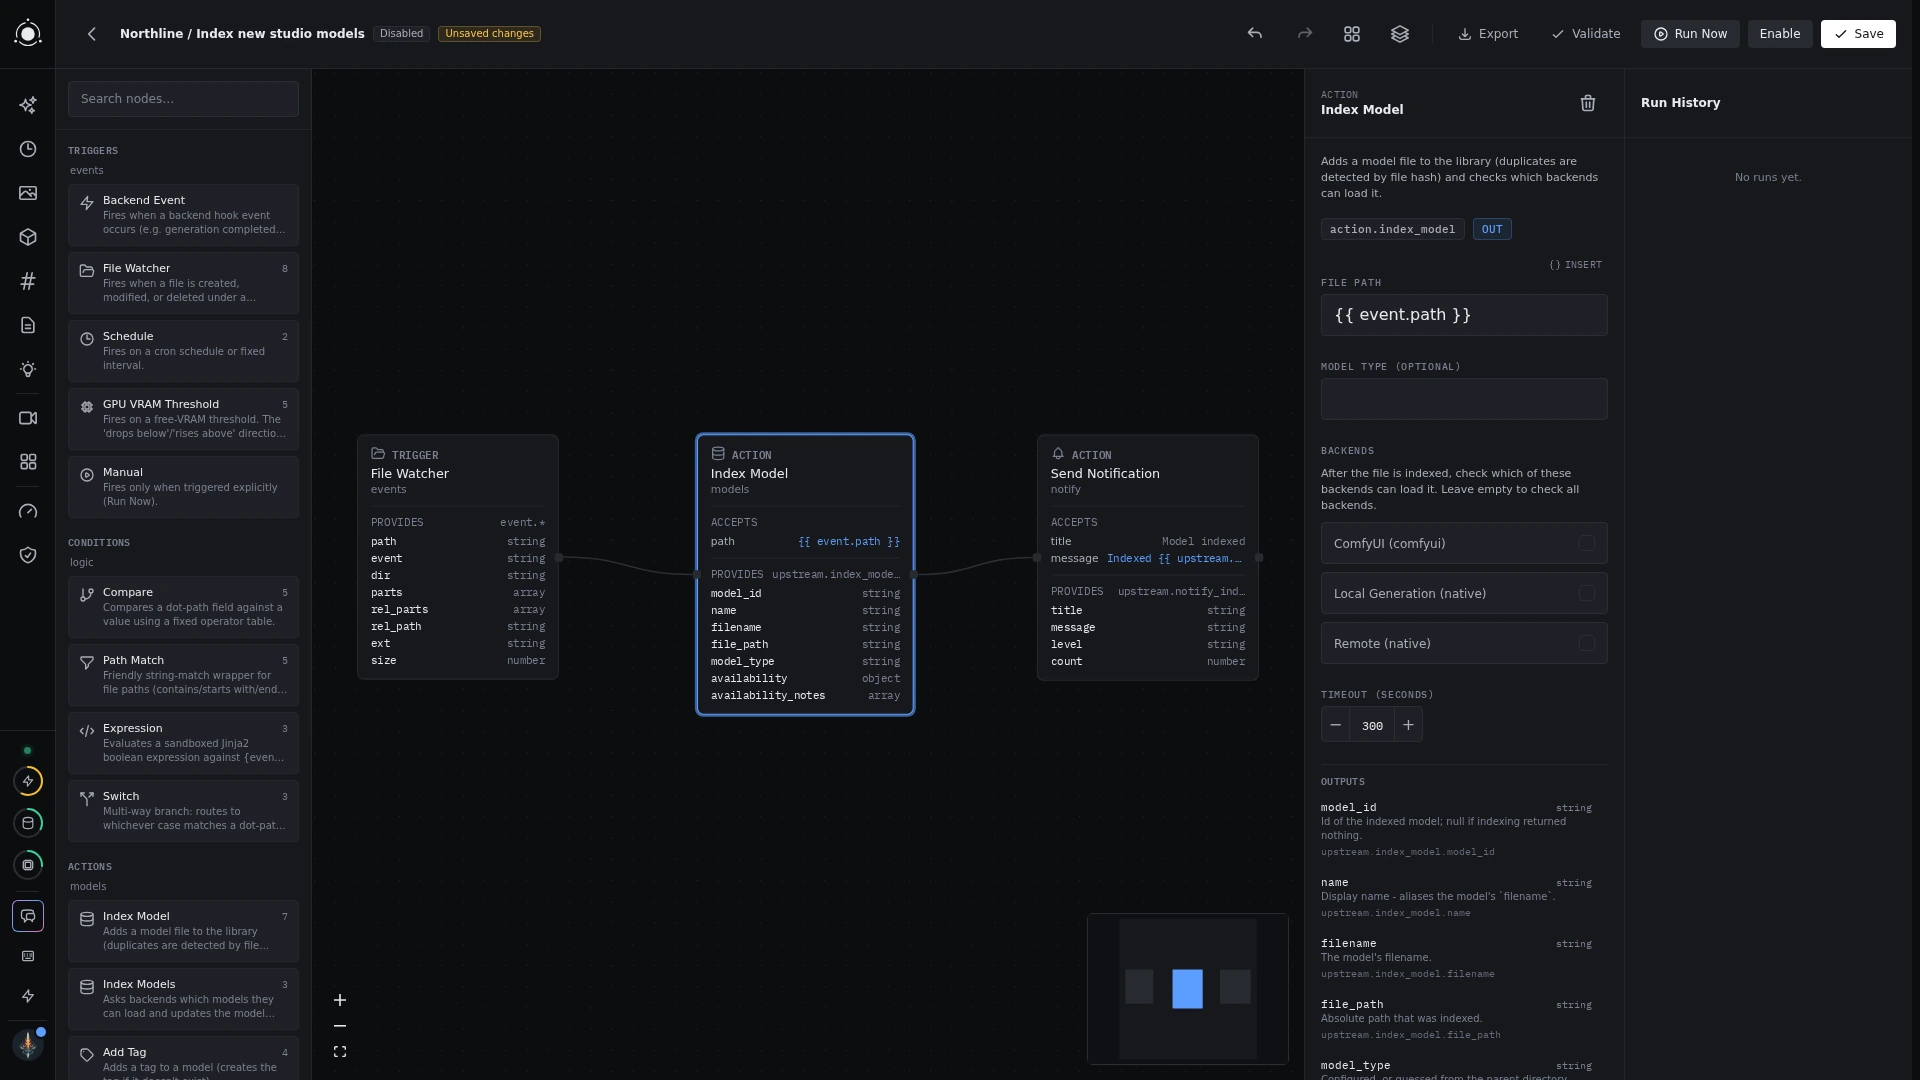 The automation editor
Configure, then inspect
Start from a template or build a graph. Configure each node’s inputs and conditions before enabling it. Use execution history and logs to understand what ran and where a step failed. Automations can be exported and imported as JSON; plugins can contribute more templates.
16 / Make it yours
Plugins & ComfyUI
Add the capabilities your studio needs.
Extend your installation
Plugins can add pages, provider integrations, generation backends, sidebar widgets, quick actions, and automation templates. Examples include model downloading, external catalog providers, system monitoring, and GPU memory cleanup.
Open Administration → Plugins to inspect installed plugins, configure their settings, and enable or disable them. Their pages and controls appear only when enabled.
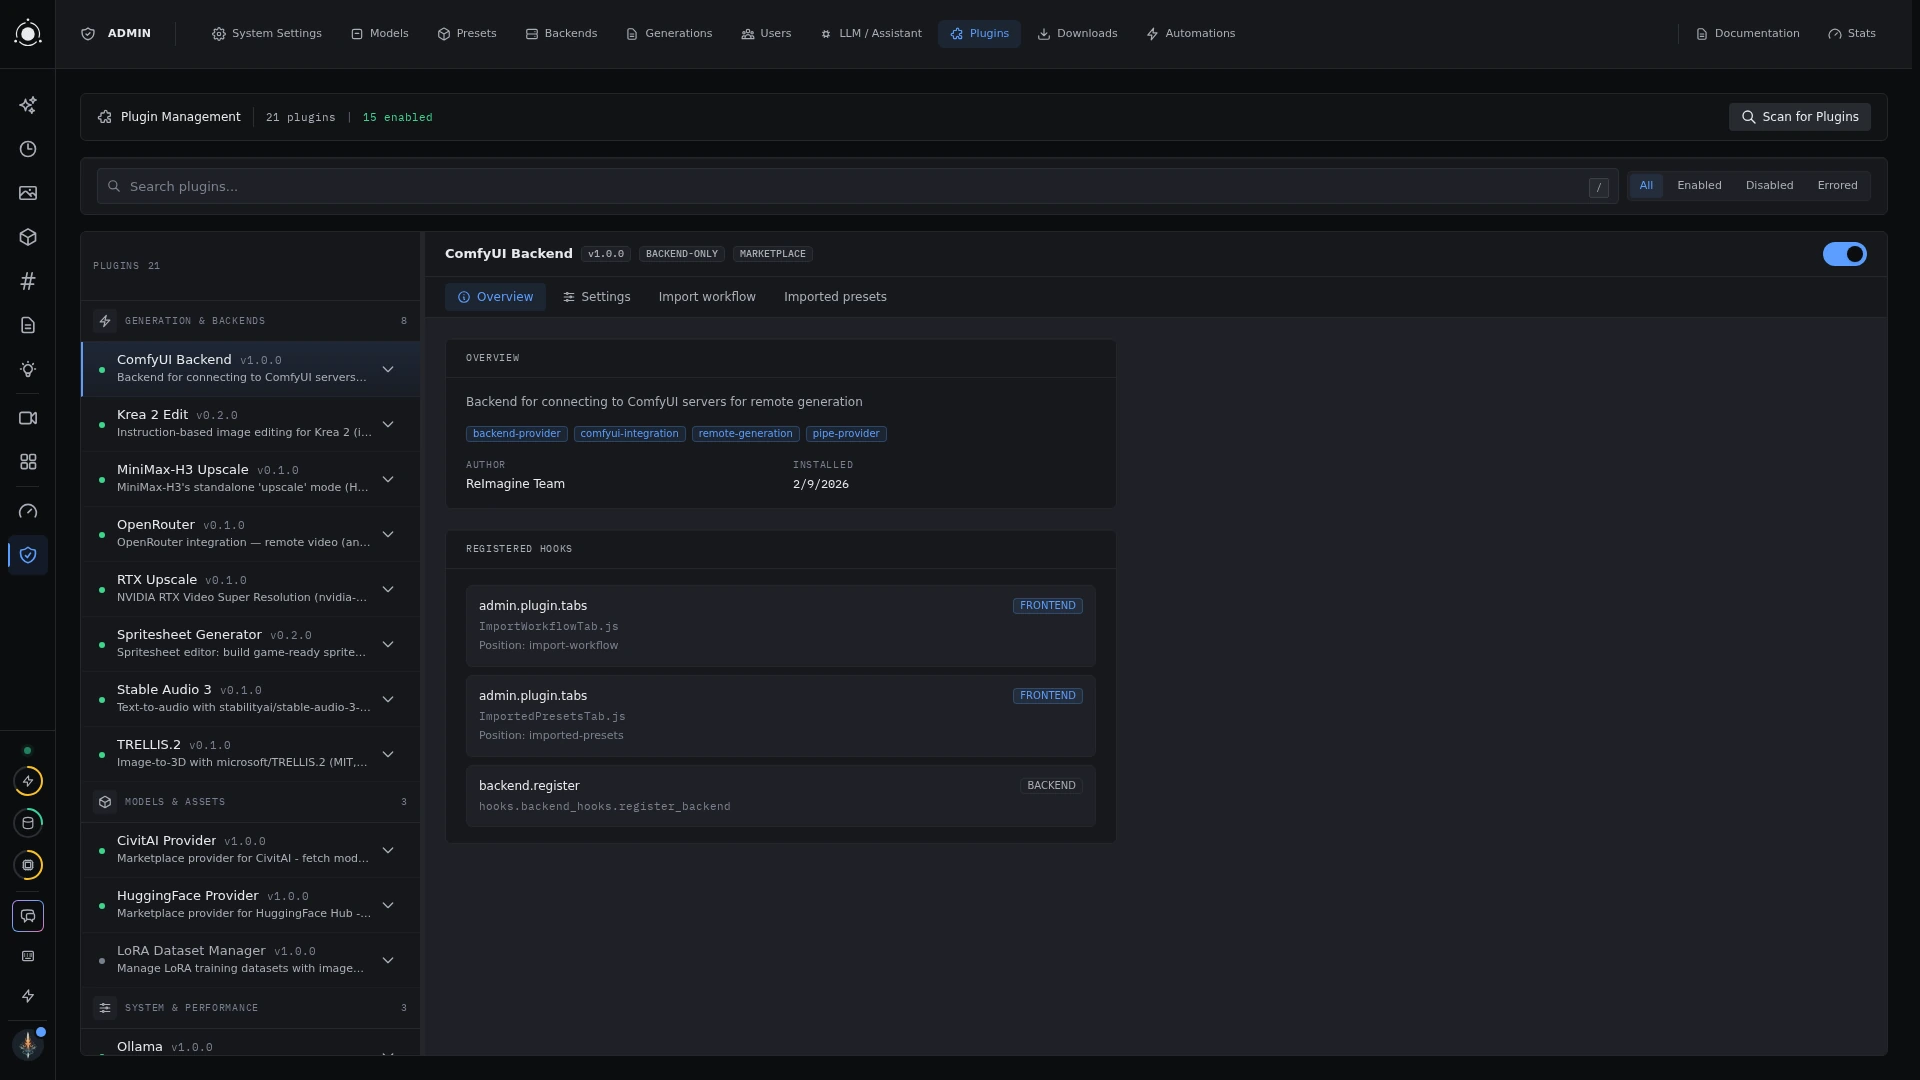 Plugin management
Bring a ComfyUI workflow
- Connect ComfyUI
Enable the ComfyUI Backend plugin and configure a reachable server in Administration → Backends.
- Export the runnable workflow
In ComfyUI, use Export (API). Enable Dev mode options if that export is missing. The regular editor export is a different format.
- Build the preset
Open Administration → Plugins → ComfyUI Backend → Import workflow. Paste or upload the JSON, design the form, select fields to record in History, and review requirements.
- Check dependencies and generate
The importer can create a preset with missing-node warnings, but the workflow needs its required custom nodes and models installed before it can run.
Build your own tools
For a tailored generation tool, start with preset authoring. For capabilities around or beneath generation, use the plugin API. The app’s Developer reference includes form field types, template functions, icons, and live previews.